
Nearly every computer user has experienced the trauma associated with losing an important document, photo or another item when his or her computer fails. Whether a hard drive crash, malware attack or another event is to blame, losing your important data is a huge headache.
Your computer stores a lot of valuable information. For example, if you have home videos or family photos on your computer, you really want to make sure you don’t lose those files. Luckily, if you back up your computer regularly, not all will be lost. Even if you experience a computer issue, you can relax and know you have a recent back up that contains modern versions of your most important information.
There are several ways to back up your system and avoid losing data that can’t be replaced. For Mac users, three of the best ways are using iCloud, Google Drive and Time Machine.
If any of these steps are too difficult, consider reaching out to our professionals technicians.
1. How to Back Up Your Files Mac Using iCloud
- From your computer’s main screen, click the Apple menu in the top-left corner of the screen.
- A drop-down will populate, and you will click on “System Preferences.”
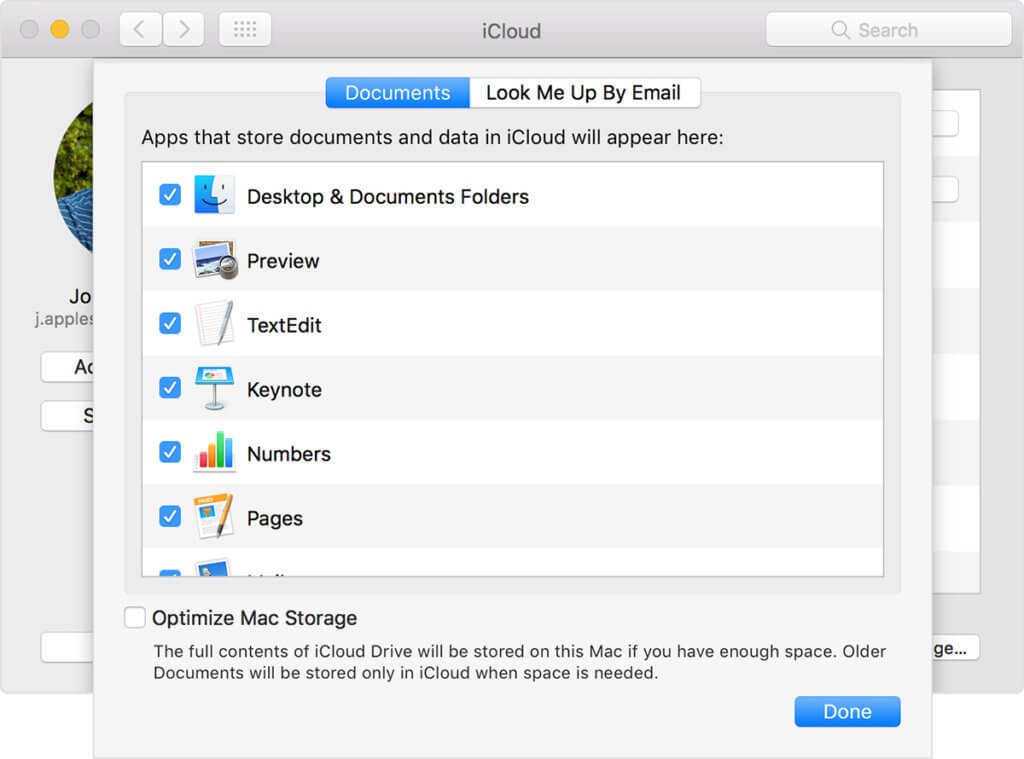
- You will see a new window, and from the said window, you will click “iCloud.”
- Within the iCloud menu, make sure there is a blue checkmark next to “iCloud Drive”. If there is not, click the box to turn on the feature.
- Select “Options…” next to iCloud Drive.
- Look at the list that comes up and make sure “Desktop & Documents Folders” is selected; by default, this item is generally not automatically selected.
- Once it’s enabled, all desktop folders and your documents will be saved on iCloud.
Another useful feature to note is the option to “Optimize Mac Storage.” When there’s ample space on your Mac, this feature allows all of your content from iCloud Drive to be stored on your computer. However, when your Mac runs out of space, the feature will put older documents onto iCloud only so your computer continues to run smoothly.
One thing to note is that the first time you back up to iCloud, or if you’ve never done this before, make sure it’s actually working. To confirm if your data is in the Cloud, go to iCloud.com on your preferred web browser. After you’ve signed in, you should be able to see all of the data that you’ve backed up.
2. How to Back Up Photos and Other Info Using iCloud
- Again, from your computer’s main screen, click the Apple menu in the top-left corner of the screen.
- A drop-down will populate, and you will click on “System Preferences.” Y
- ou will see a new window, and from the said window, you will click “iCloud.”
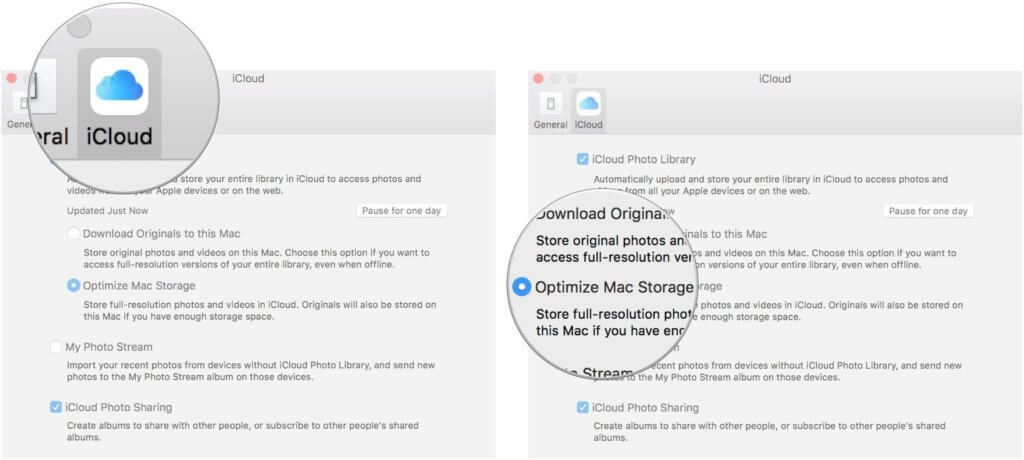
- Within the iCloud menu, make sure there is a blue checkmark next to “Photos.”
- If there is not, click the box to turn on the feature.
- Next, click “Options …” next to Photos.
- The first option displayed, “iCloud Photos,” is a good item to select because it’ll automatically make sure your photos and videos are being stored on iCloud.
- Now, go to your “Photos” app.
- Click “Photos” on the top left-hand corner of the screen and select “Preferences.”
- Next, click on the “iCloud” tab and make sure “Optimize Mac Storage” is enabled.
With the iCloud menu open, you will also see you can back up info like your contacts, calendar, notes and more. Scroll through the provided list to make sure everything you want to be backed up is enabled and will be saved to the cloud.
3. How to Back Up Your Mac Using Google Drive
You can use Google Drive to store your files in the Cloud. If you have a Google account already, you will have access to Google Drive. If you don’t have an account yet, you can create a Google Drive account. Once you’re signed in, click on your pricing options.
If you are on a free account, you have 15 GB of free storage. if you want 100 GB, 1 TB or 10 TB, you will need to upgrade to a paid subscription. The size of your back up will dictate what size premium plan you’ll want.
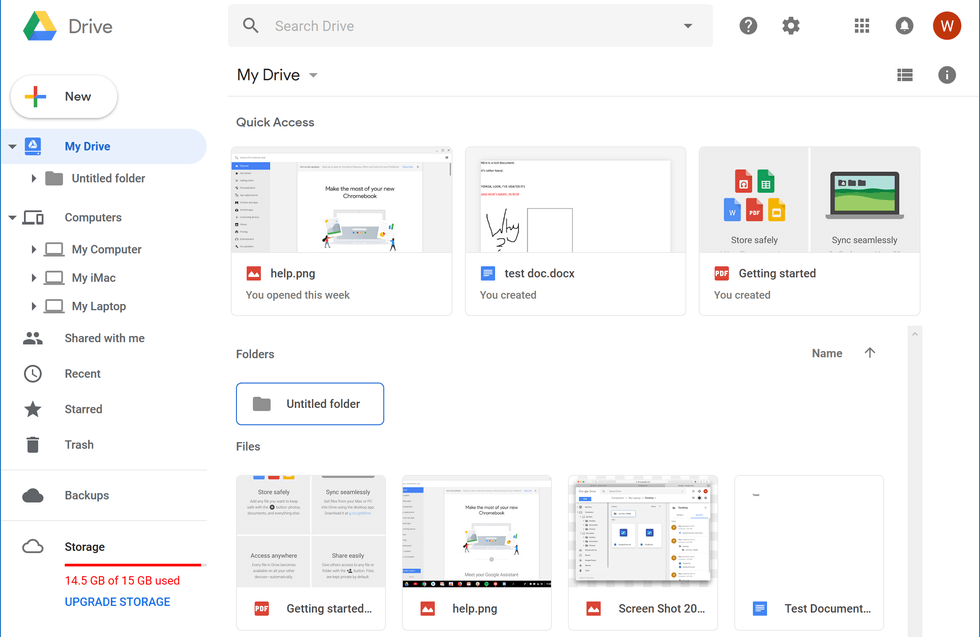
Now, download and install Google Drive for Mac. Once it’s on your computer, you can save your files to its folder. When you add info to the Google Drive folder, the data will be synced straight to Drive.
You can also choose if you’d like any folders to routinely sync to your Drive. With the app open, click “Preferences.” Then you can choose what sync options should be done by default. This way, your folders will sync without you having to manage them by hand.
4. How to Back Up Your Mac Using Time Machine
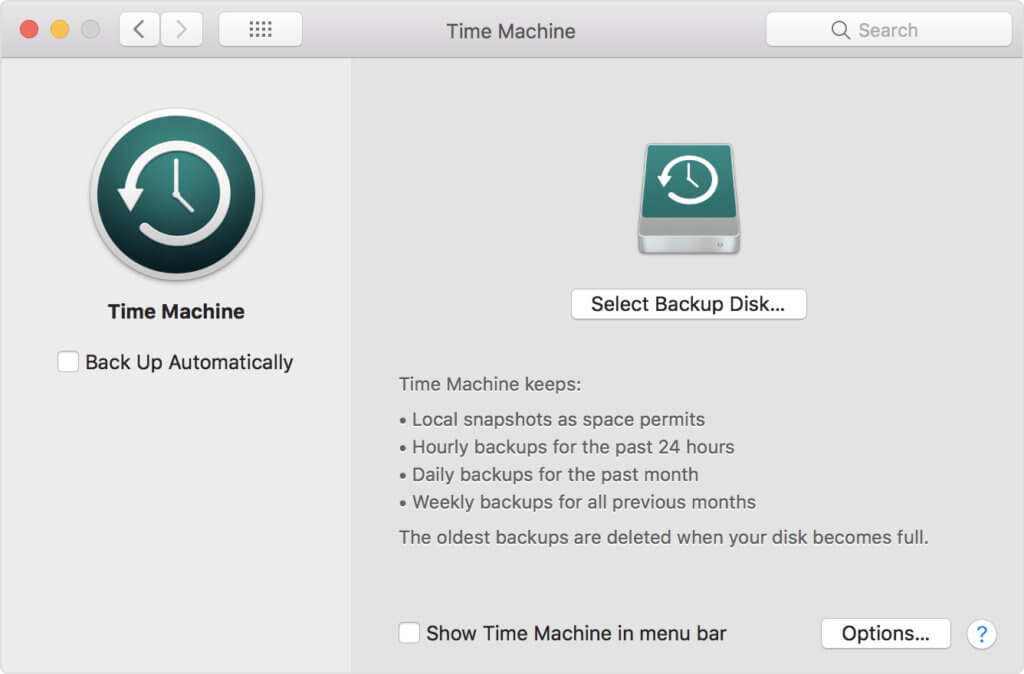
At some point or another, nearly every Mac user has been told to back up their computer with Time Machine. If you’re unfamiliar with Time Machine, it’s a software that comes preinstalled on your Apple computer.
Even if you’re already backing up your device with iCloud or Google Drive, computer experts suggest that you do a secondary back up using Time Machine. This way, if your internet goes down, you will have a back up close at hand.
To use Time Machine, you’ll first need an external hard drive. There are tons of options on the market, which can make choosing a product overwhelming. When you’re evaluating your options, there are a few things to keep in mind.
First, the storage capacity. The more storage you’ll need, the more expensive the product will become. You want ample storage for your data, but you don’t want to overpay for a ton of storage you won’t use.
If you are having any kind of difficulty deciding what size external hard drive you need for your Mac, please consider reaching out to HelpCloud Technicians for remote support.
In addition to size, you will want to think about the transfer drive you need. Transfer speed impacts how quickly your hard drive can operate. Another feature to consider is the durability of your hard drive.
Some options are waterproof and can be accessed even after they’ve gotten wet. Make sure the hard drive you pick is durable and somewhat protected from the elements in the event a disaster occurs or for some reason your external drive experiences an unfortunate event, like becoming wet.
Once you’ve decided on the hard drive you’re going to use and plugged it into your computer, click the magnifying glass icon at the top-right corner of your desktop’s screen. Within the search bar, type “Disk Utility.”
Double click the icon for Disk Utility and click on the external hard drive you plugged in. If you’re using a new hard drive, it should be empty. If you are using an old one that’s been utilized in the past, click “Erase” under Disk Utility’s top menu.
A pop-up will show, and it’ll ask if you want to erase the selected hard drive. If you say yes, all the data stored on it will be erased and the data can’t be recovered. Before you erase anything, you can rename the hard drive and change its formatting if you so choose.
One of the more popular options for formatting is “Mac OS Extended (Journaled).” Erasing generally takes less than a minute or so. Once it’s finished, it might automatically ask if you want to use the external hard drive as a back up disk.
If you don’t see this option, open your System Preferences and open the Time Machine application. Click “Select back up disk” and then click on your back up hard drive.
Restoring From a Backup
Restoring from an iCloud back up is easy. After you sign in to your iCloud account, choose the back up you want to use. You may need to sign in with your Apple ID and password before the process will begin. After you’ve selected your back up, the process commences.
To restore from a time machine back up, plug in your back up disk and make sure it’s turned on. A “Migration Assistant” window will likely come up, asking you how you want to transfer the data from the drive onto your computer.
You will elect to transfer information from a Time Machine back up and then decide which back up you’d like to use. After you’ve picked your back up version, you can decide what info you want to transfer.
If you need to restore from Google Drive, it’s generally easiest to download the files you need from Drive back onto your Mac computer.
Regularity Is Key
To protect yourself and your important data, you should be backing up your computer regularly. Whether you use iCloud, Google Drive, Time Machine or a combination, having timely backups can save you hours of agony when a power surge, hardware failure, natural disaster or other episode threatens your data.
At least every week, you should back up your important files. If you’re working on an important project, it’s wise to back up your info every 24 hours. If this seems like too much of a pain to manage, remember you can back up automatically.
Following the information above, you can make sure your computer’s information is duplicated in a safe location that can be easily accessed in case anything goes wrong with your Mac.
