- Error Message: Scanner Not Found
- The Paper Jam
- Scanner will not Scan
- No Connection to Scanner
- The Scan was Unsuccessful
In times past, getting your hands on a particular document from a few years before would have been a nightmare unless you were super proficient in the art of filing. However, these days it is so much easier and only takes a few seconds to find what you’re looking for because, for the most part, it is all digitized.
By having all your personal and business documentation scanned and in digital form, you can save not only time but space as well — no need to keep that bulky filing cabinet in your office anymore.
It provides you with a backup of all important documents in the event that your hard copies get destroyed. It’s so much easier to have it all at your fingertips instead of needing to rush around searching for it. To make this happen, all you need is one vital piece of hardware.
Over the years scanners have been upgraded and revamped and now we even have those that are able to run on Wi-Fi and don’t need you to be connected via a cable at all. With that being said, with new technology there are new problems, although there are some problems that are similar to those experienced on older machines.
Whether you have a flatbed scanner, a printer and scanner in one or one of those printer/scanner/photocopier machines, one thing they all have in common is technological failure.
So what happens when your scanner won’t do what it needs to do? You’ve installed it and you’re ready to get scanning; only error messages keep popping up instead of the document you are trying to scan.
When this happens it can be highly frustrating and cause a lot of unnecessary stress. Unfortunately, though, these things do tend to happen to the best of us but don’t be alarmed because we have drawn up a list of some new issues you may run into and also how to resolve them.
1. Scanner Not Found
First things first, when you try to scan but find that your computer can’t locate your scanner always check and make sure that your scanner has been connected to a working power supply.
Yes, we’re aware this sounds clichbut there are times when it really is as simple as that. Make sure you cover your bases by checking the cable that connects to the USB port on your computer as well as the power supply that connects to a wall socket from the scanner. Switch the cable to a different USB port on your computer and try again — and do the same for the wall socket.
If it still doesn’t work, you might need to repair damaged system files. To do this you will need to hold down the Windows key and R together, which will open up the Run box. Now type in cmd and hit the Enter key.

If you are not running the program as the Administrator then you will need to press the Windows Key and X together and then select Windows Powershell (Admin) after which select Yes or Okay to run in Administrator mode.
You can then type in sfc/scannow and your computer will scan your system files and repair any issues there may be. Depending on which system you are working on, the Windows Powershell could be called CommandPrompt (Admin) instead, but it is the same thing.
One other thing to check is that all old scanners have been uninstalled before you install a new scanner. The reason for this is that those old files could be preventing your computer from properly detecting your new scanner.
2. The Dreaded Paper Jam
Whilst many people use a scanner by lifting the scanner lid, placing the sheet they want to scan directly onto the glass and then closing the lid and pressing the Start button, others may have a scanner that uses an ADF (automatic document feeder). If you use the ADF, you may be faced with the dreaded paper jam problem from time to time.
When this happens, you will be given a “Document Jam” or a “Clear the scanner jam” message. There are a few reasons why this error occurs, one of which is that the paper was loaded incorrectly. The first thing that you need to do when this happens is to remove all the paper that is still in the ADF.
Once you have done this, you can then start to locate where the jam has occurred. To do this you will need to open the ADF feeder — depending on which scanner you have, this could be located either in the front or on the side of the scanner.
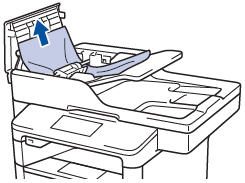
You will usually be able to clearly see the paper jam once the cover is open. Carefully remove any visible paper from the scanner by pulling it out gently so as not to tear the paper. Thoroughly check to ensure that all little bits of paper have been removed because even if there is just a small piece of paper left it will continue to show as a paper jam.
However, if the paper doesn’t want to come out, you will need to press the Cancel button (usually displayed by a red X) so that the document will be fed through far enough for you to be able to gently pull it out. Once you have removed all the paper, you can then close the ADF cover again.
Now you will be able to reload the document for scanning, being careful to load it correctly so that it is straight. One thing to note is that whilst 99 percent of all jam errors are due to paper jams, there are some times when you will receive a paper jam error message and there won’t be any paper jams.
When this happens, it could be an indication that your scanner just needs a thorough cleaning. Like all technology, scanners need to be maintained on a regular basis. To clean your scanner you will need to consult the user manual which you received when you bought your scanner in order to ensure that you clean it with the right materials.
3. Your Scanner Won’t Scan
Sometimes we can all get a bit impatient, which then leads to us being over-hasty in doing things like setting up the scanner or allowing it to properly start up. Once you have switched on your scanner, you need to wait until the Start button shows green (if it is one that has lights), otherwise give it time to warm up, which usually doesn’t take more than four or five minutes.
If you are using a scanner that connects via a cable, make sure that you are using the original cable that came with your scanner. While other cables will fit, they could cause connection issues and your scanner will not be able to scan. In the event that you need to replace the cable, make sure that you buy one directly from the manufacturer of your scanner in order to ensure you get the right cable.
4. No Connection to Scanner
Wi-Fi is awesome, but let’s be honest … it can also be a bit of a pain. For instance, you decided to go cordless and got yourself a brilliant little Wi-Fi printer/scanner. You get it all set up and then switch it on but it won’t connect.
When this happens there are a few options. Firstly, you can check to see whether or not your scanner has been installed correctly. To do this, navigate to Start, then Settings (the cog shaped icon), and then select Devices, then click on Printers and Scanners.
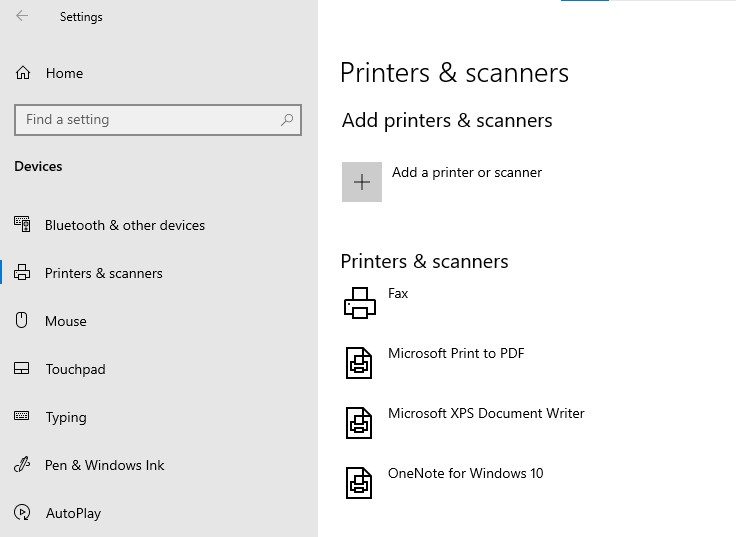
If your scanner has been installed correctly, it will show up in the list. If you have a two or three in one device then you will select your printer from the list and then left-click on Manage. This will then show you your scanner.
Perhaps it’s all been running great but then one day you notice it is slower than usual and suddenly your scanner is saying it can’t communicate with your computer. Not ideal … and the reason for this could quite probably be because there is a break in your Wi-Fi speed or connection.
When this happens you could just decide to wait patiently until your Wi-Fi is back up and running ideally, or else you can get out your trusty network cable and connect your computer to your scanner.
5. The Scan Was Unsuccessful
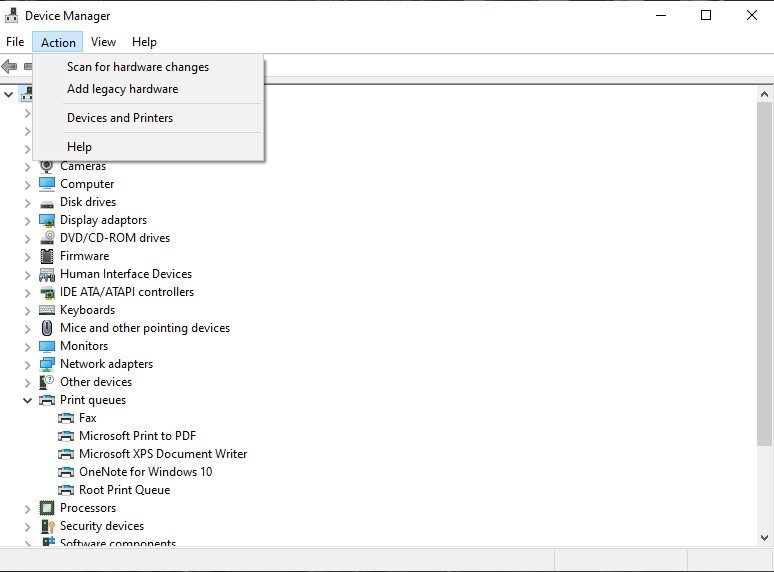
If you are faced with a “Scan Unsuccessful” error message, first restart your scanner and computer and try again, but if the problem persists you will most likely need to reinstall your scanner’s drivers. To do this, navigate to Start, then type in Device Manager and click on Enter.
Now select your scanner from the list. Right-click and select Properties. Now select the Driver tab and then click on Uninstall and then click OK. Once you have done this, left-click on the Action tab in the Device Manager and then select Scan for hardware changes.
You will either receive a message stating that Windows needs to install driver software for your device (which means you will need to select Locate and install driver software (recommended)) or else you may receive a message stating that a hardware device is being installed and that the uninstalled device is now visible in Device Manager.
If you don’t receive either message, though, you may need to buckle down and run a Windows Update. Or you could also run the inbuilt troubleshooter program on your computer.
If All Else Fails …
Naturally, there will be times when you try all these things and by some awful bit of bad juju, it won’t work. When this happens, you have one of several options — either give up and get a new scanner (which could end up working out quite expensive at the end of the day), or you could call in the experts and have them diagnose the problem and solve it for you.
You could also run a hardware troubleshooter on your computer by going to Start and then selecting Settings (depicted by the cog shaped icon) and then left-clicking on Update and Security, then on Troubleshoot.
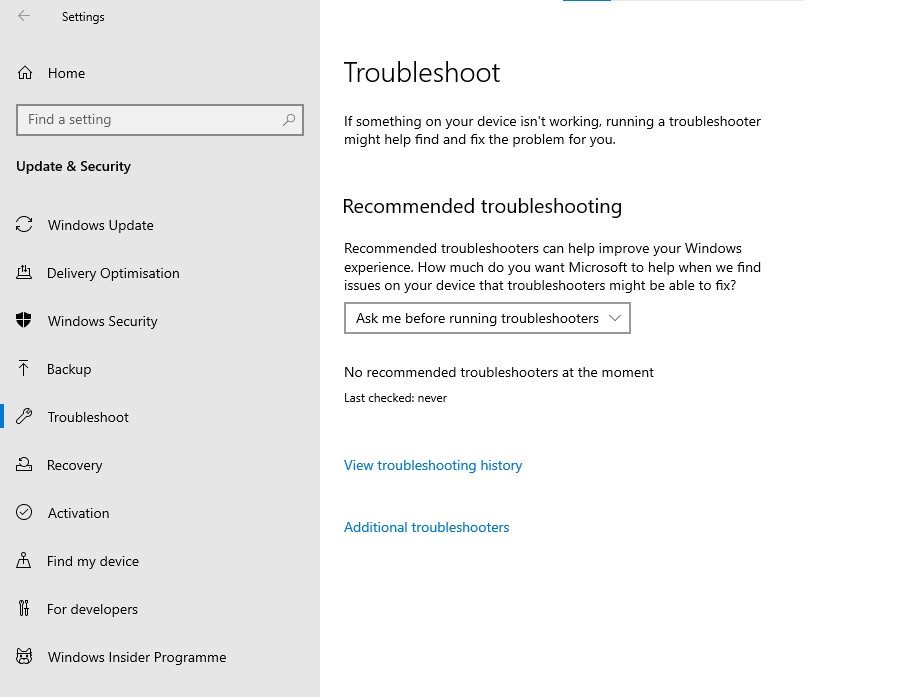
Left-click on Additional Troubleshooters and then select your scanner from the list and run the troubleshooter.
As always, if you’re needing any kind of additional help fixing any kind of issue with your scanner, consider reaching out to HelpCloud technicians for remote support.
