
What is HostGator
Deciding on a web hosting provider and related services is never easy. There are a few trusted providers that have stood the test of time. One of those is HostGator. HostGator was founded in 2002 and continues operating today based in Houston, Texas. Services provided include a long list of hosting services, domain registration, transfer and management services, as well as web design, PPC and SEO services. The web hosting side of the business currently hosts over eight million domains on the world wide web.
If you’re looking for the HostGator login, you can find that here.

HelpCloud is an affiliate marketer for HostGator. By clicking on these links or ads we will receive a small commission if you purchase HostGator products on their website. Check us out on HostGator here.
Why HostGator
This article will focus on setting up a domain via HostGator shared web hosting service and how to configure and connect a WordPress instance with HostGator. If you are looking for a product overview of HostGator services then you can read our HostGator product overview here.
In 2015, the partnership between HostGator and WordPress launched a managed WordPress offering. If you use WordPress and need a quality and affordable web hosting provider, HostGator is for you.
HelpCloud is an affiliate of HostGator. Through our affiliation, we receive a commission for referring you to HostGator. As an affiliate we can provide you with a 30-60% off promo code. You’ll want to choose your desired web hosting service and use the following promo code before checkout: HELPCLOUD

How to Sign Up for and Activate HostGator
First and foremost you will need to decide what web hosting service fits your needs. HostGator offers Shared, Reseller, VPS, Dedicated, and Windows web hosting.
A Breakdown of the Types of HostGator Web Hosting Services:
Shared Web Hosting:
This is the most economic option for a web hosting service. If you have just one website, are new to setting up a website and its respective infrastructure, or don’t plan on hosting and being a system administrator for multiple client websites then this will be the best option for you. We suggest this for most users. Learn more here.
Reseller Hosting:
This is a great plan for someone that plans on part-time of full-time hosting client or other businesses websites. This plan would be for an agency, web designer or webmaster. Learn more here.
VPS Hosting:
This type of service is for a true webmaster and web developer. VPS Hosting allows the user to fully control and manage their hosting environment. It also includes a completely private server hosting that is fully dedicated to the website. This service is for those that know how to start small and scale to their websites needs by customizing as needed. Learn more here.
Dedicated Server Hosting:
Dedicated server hosting is also referred to as managed hosting service. This service is where a client pays for an entire server and does not share it with anyone. The client has full control of the server or servers, including choosing the operating system and hardware dedicated to the server. Learn more here.
Windows Hosting:
Directly from hostgator.com:
HostGator Windows hosting solutions includes the flexible and easy-to-use Parallels Plesk control panel, as well as unlimited subdomains, FTP accounts, and email addresses. Additional unlimited features with our Windows shared hosting include MySQL, Microsoft SQL, and Access Databases.
All Windows hosting plans also include free website building tools, over 4,000 free website templates, one-click installs of many popular scripts, and many additional features!
Source
Learn more here.
Sign Up with HelpCloud’s Promo Code:
Don’t forget that if you sign up for a HostGator account, you can do so via HelpCloud and save 20-60%. HelpCloud will receive a small commission for referring you to HostGator. At Step 6 of the setup, your promo code will be: HELPCLOUD

How to Setup HostGator
The following tutorial is available on the HostGator website here. If you are an existing customer, please follow the instructions are available here.
We’re going to be following the tutorial for setting up the most common instance, a shared web hosting service. HostGator has their own write-up here. Additionally, a general and simple breakdown on getting started on HostGator can be found here.
Decide on Your Web Hosting Plan
After reading the synopsis of each web hosting service above you should be able to decide which is for you.
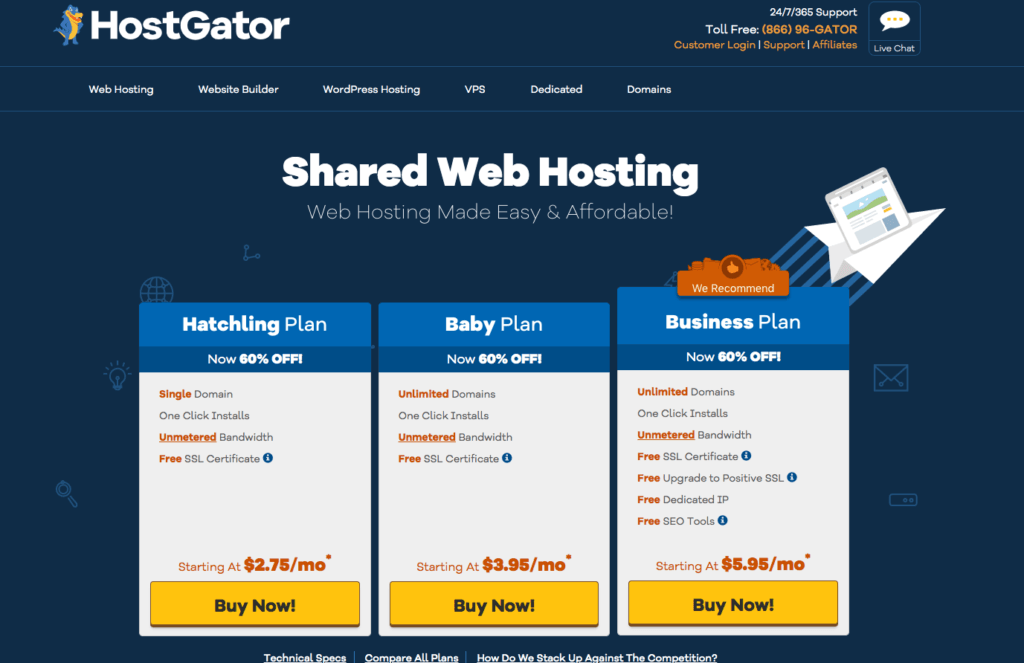
After clicking on the plan that you want you will be taken to a checkout where you will perform the following:
Step 1: Choose and Setup a Domain
You will either be purchasing and configuring a new domain via HostGator or transfer an existing site. This tutorial will cover how to setup a new domain but you can find the tutorial for transferring an existing site to HostGator here.

You will either 1. Register a new domain through HostGator or 2. Claim a domain that you already own.
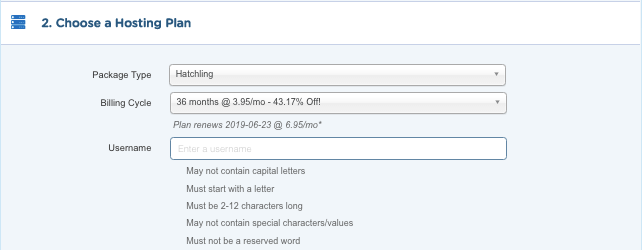
Step 2: Choose a Hosting Plan
You will be asked to verify the hosting plan’s package type. Next, enter in your billing cycle (keep in mind that HostGator auto-renews, so you need to cancel your account previous to the new billing cycle). Last, you will choose and setup your username.
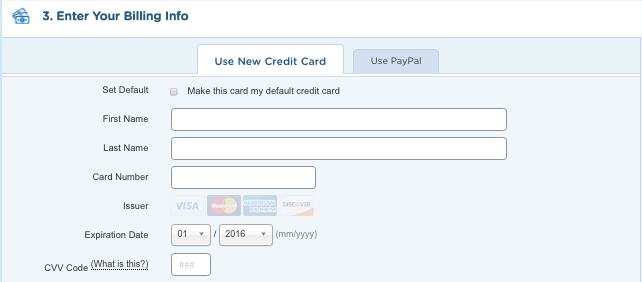
Step 3: Enter Your Billing Info
This is a straightforward step where you will enter the necessary details in order to process the payment.
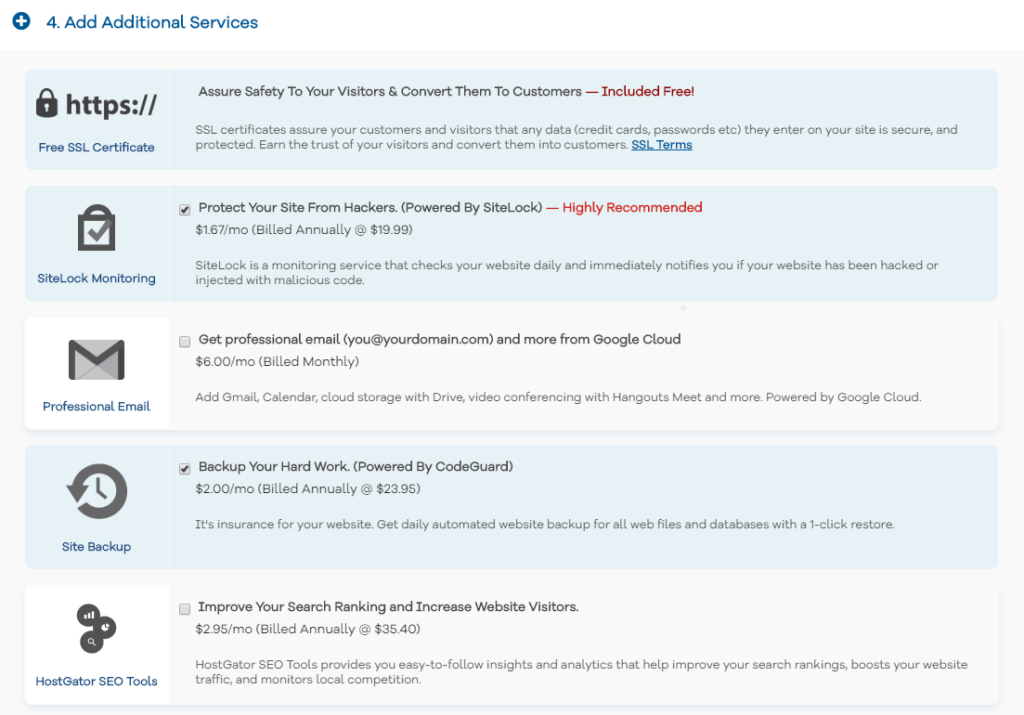
Step 4: Add Additional Services
Each package will include the option to select additional services to add to your package. Choose the ones you prefer or need and continue.
Step 5: Enter the HelpCloud Promo Code
Our 60% off promo code is: HELPCLOUD
Step 6: Review Order, Terms and Conditions, Checkout
Following these steps you will continue to setup your account. The best resources for the tasks you will have to complete to get online and finish configurations can be found here.
Going forward you’ll want to log into your HostGator account here.
How to Install WordPress on HostGator
This tutorial is how to install an instance of WordPress via QuickInstall but does not cover how to install an Optimized WordPress account with HostGator. You can find instructions for that here.
Step 1: Log into HostGator
Log in via this link: https://portal.hostgator.com/login
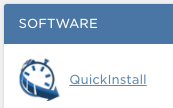
Step 2: In the software section, locate and click the QuickInstall icon
Step 3: Find the One-Click Installs component and click
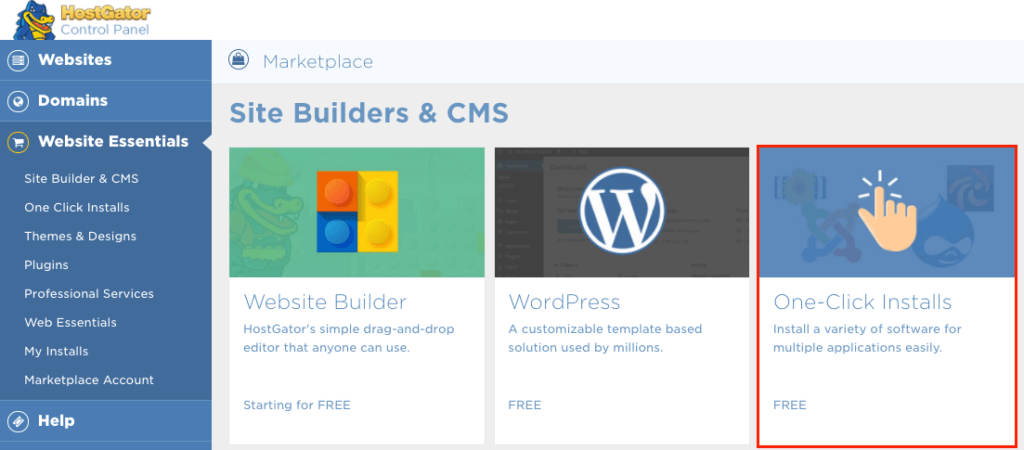
Step 4: click the WordPress icon
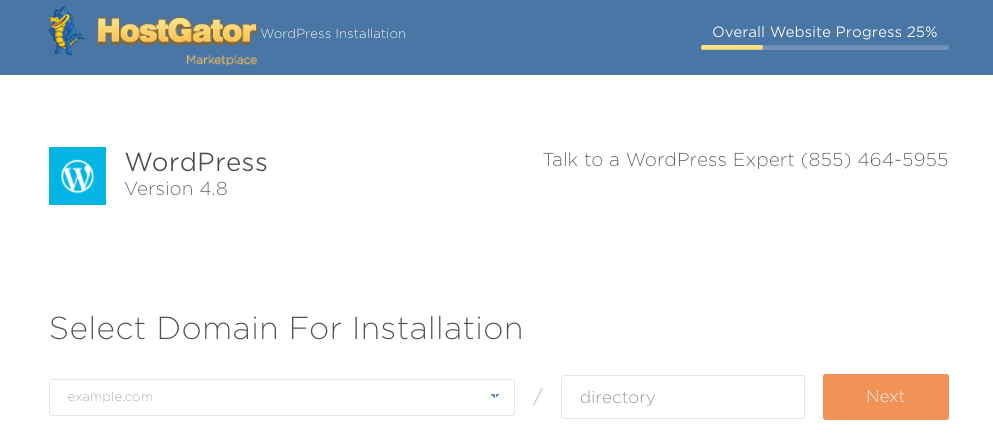
Step 5: Chose the domain that your WordPress instance should be installed to and the subdirectory you wish the site to load from
Step 6: Complete the form as follows:
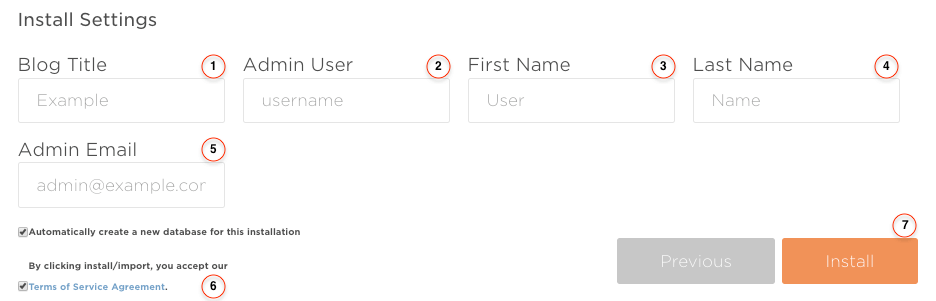
As taken directly from support.hostgator.com:
- For Blog Title, enter the name of the website. This is what will appear in the header as the name of your site.
- For Admin Username, enter your preferred username.
- Your first name.
- Your last name.
- For Admin Email, enter an email address where you want the admin password emailed to. Make sure this is a working email address.
- Check the box next to the Terms of Service Agreement.
- Click the orange Install button when you’re ready to proceed.
Step 7: When the installation is complete click Details and you’ll have your admin URL, username, and password.
An email will be sent with the WordPress username and password as well as a link to the login.
Now that you know how to install WordPress onto your HostGator shared web hosting service, you can learn how to manage your WordPress installation here.
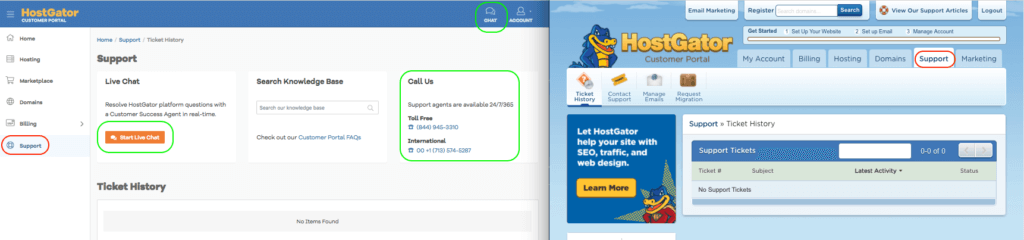
How to Access HostGator Support
If you are in need of support and have any issues then you can contact support by phone or chat.
Conclusion
HostGator is a great option for all types of users from a beginner starting their first website to an individual or agency looking to host large enterprises or multiple clients on their own instance. The seamless integration with WordPress and other features are proof that HostGator is continuing to evolve.
Remember to use our promo code for 30-60% off your purchase!
PROMO CODE: HELPCLOUD
If you sign up for HostGator through our affiliation, you get:
- 1-Click WordPress Installation
- Free SSL Certificate
- 45-Day Money-Back Guarantee
- $100 Google Adwords/Bing Ads Credit
- 24/7/365 Technical Support
Visit here to learn more.