
In a world booming with technology and gadgets, we now don’t even think twice about connecting to the internet or surfing the web, we don’t have to scratch our heads in wonderment at Wi-Fi and wonder what it stands for. All of these things come naturally to us now, without us having to even think about them.
While we connect to the internet, though, does it ever occur to us to enquire as to how it all actually works? How do we magically get directed to a site of our choice by simply typing a few words into the address bar?
Computers don’t talk the same language we do, they have one that is all their very own and it is a language based in numbers. Thankfully, the smart techies who designed computers and have developed them over the years have made it possible for us to work on computers without having to learn this intricate language of numbers.
Added to this, it is easy to forget that the internet isn’t some mythical presence in a distant land of binary code. It’s a very physical thing and it uses a lot of different components, all of which are physical and real … and can lead to rather a lot of trouble if you aren’t careful.
What Are They and What Do They Do?
So what is a DNS server? To put it simply, it is short for Domain Name System. Think of it as the telephone book for IP (Internet Protocol) addresses. When you type a domain name (such as Google.com, or HelpCloud.com) into the search bar, the DNS is what will make sure that you are directed to the correct IP address that matches that domain name.
Once it has done this, the DNS server even remembers this domain name (saves it/caches it) so that it can respond quicker to your request the next time around.
What the DNS server does is to translate the domain name which you typed into the address bar into a numeric IP address and within just a second or two you will be redirected to the correct page. How did you get your DNS, you ask? Well, your ISP (Internet Service Provider) provides you with one right from the beginning of your computer experience.
Everything is done “behind the scenes” so to speak, which is why it can be so easily taken for granted and why we don’t pay it too much attention. But unfortunately, since we’re talking about the gargantuan World Wide Web, there are sleazy miscreants out there who have figured a way to corrupt the amazing way in which DNS servers work.
Why Make the Change?
It is because of these criminally minded miscreants that we are forced to take more serious precautionary measures. Due to the fact that your DNS server has everything to do with your every move on the internet, it is crucial to make sure you have the one that is best suited to your needs.
Nefarious fraudsters are constantly on the lookout for ways to nab your personal information and use it against you. You can avoid most of these crooks by simply keeping a very sharp eye on your address bar when you are typing in an address.
By making sure that you spell the domain name correctly and that there are no words spelled incorrectly or added letters, you will be able to protect yourself against most of these scammers.
What these phishing fraudsters do is poison your DNS cache by infiltrating incorrect information into your Domain Name System by managing to manipulate the cache. Basically what happens is that you will type in a valid domain name but the poisoned DNS cache will return an IP address for a scammer’s site, although the address bar will show the correct name.
The site, however, will be a clever imitation of the real thing, although sometimes there may be some mistakes which will alert you to the fact that it is a fraud.
Another point to keep in mind is that the DNS server you have been allocated might not have been properly set up for caching (remembering domain names), or it could be running slow. Should this be the case, then it will have an impact on your connection speed. This is certainly what happens when you load a web page that draws its content from many different domains, such as affiliates and advertisers etc.
If you think that there may be something wrong with your DNS cache (such as being poisoned by a scamming scalawag), you can flush it out by simply following a few easy steps. All you have to do is to go to your Start menu and type in CMD and then choose the Run As Administrator option next to the Command Prompt heading.
A window will open and you will then need to type in ipconfig/flushdns and then press Enter.
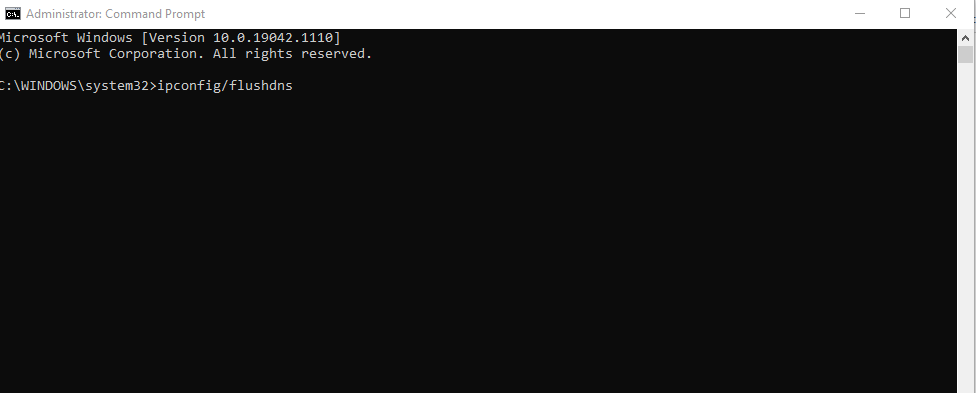
Once it has successfully flushed out, you will receive a message that says successfully flushed the DNS Resolver Cache.
So why make the change to a new DNS server?
The biggest reason is for safety, being able to be secure in the knowledge that you won’t be redirected to fraudulent sites once you have entered a domain name. Another reason is to be able to speed up your internet browsing experience.
How to Choose and Change Your DNS Server
Firstly, it would be a good idea to choose your new DNS server. There are quite a few out there to choose from but it would be wise to go with one that is trusted and has a good reputation.
One of these trusted DNS servers is Google Public DNS, which has been around for close on to ten years. It’s easy to remember IP addresses are a winner (8.8.8.8 and 8.8.4.4) and it comes with a promise from Google to provide a secure DNS connection that is safe from all attacks from hackers and scammers. Plus it also promises greater connection speed.
If you feel they haven’t been in the market long enough, perhaps you would prefer to try OpenDNS which has been in business since 2005 and also offers an option called FamilyShield servers that will filter out inappropriate content.
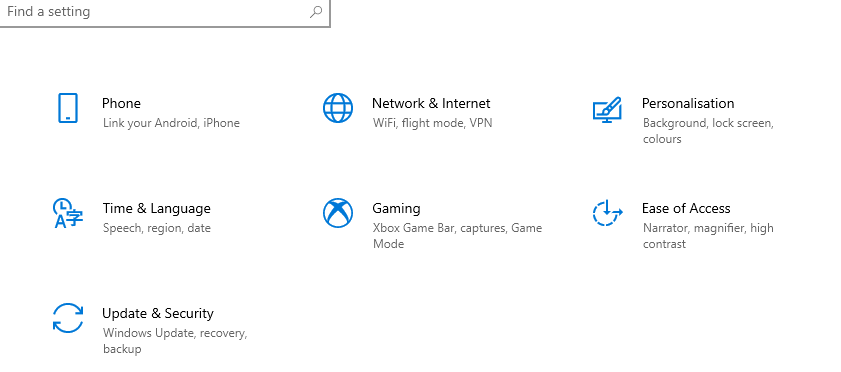
Once you have made a decision as to which DNS server you are going to be using, it is then time to make the change over. To change the DNS settings on your Windows 10 device, navigate to the Start button and then left-click on Settings which is depicted by a gear-shaped icon. Now you will need to left-click on Network and Internet.
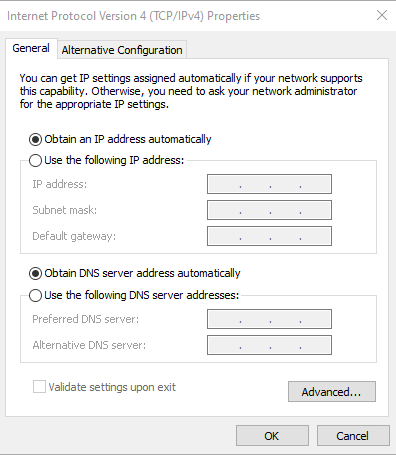
Left-click on Change adapter options and then right-click on the Wi-Fi connection and select Properties

First you will need to left-click on Internet Protocol Version 4 and then left-click on the Properties option. This opens up a new window.
Select the option that says Use the following IP addresses and then in the two spaces at the bottom of the screen, where it says Use the following DNS server addresses, type in the two addresses of your chosen DNS server.
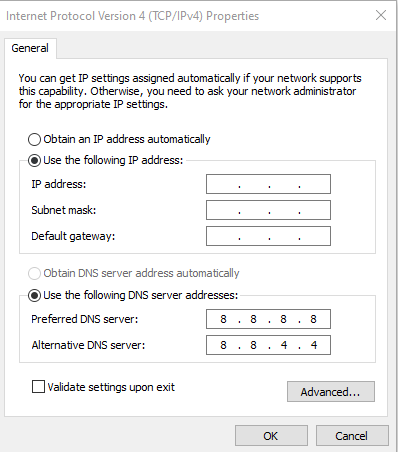
Now left-click on OK and that’s it. Quite a few steps, but in the long run it will be well worth it. It would be advisable to make sure that you configure all of your devices so that each one will be secure, no matter where you connect to the internet.
You can change the DNS server for your home router, which will automatically impact every device running on Wi-Fi in your home. However, there isn’t a generic way to do this, so you will need to head on over to your search engine and type in Change DNS along with the make and model of your router. Once you have found instructions and followed them, you might need to restart your router so that the changes can take effect, although this isn’t always the case.
As regards your mobile devices, it would be best to just run a very good VPN as there aren’t any permanent changes you can make to your DNS server on your phone. Whilst you are using it on your home network it will be safe, but when you venture out and connect to other networks you will need the VPN for protection.
Seize the Hour!
With so many reasons to change your DNS server, why not seize the hour, redeem the time and make the change today? Take the first step by choosing your new DNS server and then just follow the few easy steps to make the change.
You won’t regret making the change, in fact, you’re probably going to be too busy catching up on some browsing, now that your connection is faster, to complain anyway. Just remember to keep the browsing limited to your home network or, if you’re on public Wi-Fi, make sure you’re using one of your protected devices.
As always, if you’re needing any kind of additional help either understanding the importance of changing your DNS or learning more about how to actually do it yourself, consider reaching out to HelpCloud Technicians for remote support.
