Table of Contents:
- 3 Ways to Pin Apps to Taskbar
- Unpin Apps From the Taskbar
- Customizing and Using Jump Lists
- Resizing and Moving Your Taskbar
- Customizing Icon Size
- Change the Taskbar’s Appearance
- Adding and Using Toolbars
If you’re like most people, you probably have a number of favorite apps and websites that you use every day or almost every day. Did you know there’s a way to make it easier for yourself to access these apps? That’s what your Windows 10 taskbar is for. Windows 10 was released in 2015 and allows more customization than ever.
Customizing your taskbar allows you to save shortcuts to all your important locations. There’s no need to search for your most used apps every day when using them. If you check the weather or news each day, you should create a shortcut. You can create a shortcut with an icon for any app on your computer. Customization can save you tons of time and effort — here’s how to do it:
3 Ways to Pin Apps to Taskbar
The first step in customizing your Windows 10 taskbar is to create shortcuts to your favorite apps by pinning them to the taskbar. To do this, open the app you’d like to pin. Any app can be accessed from the Start menu on your desktop.
Typically, all your apps will be listed in your start menu in alphabetical order, so simply scroll until you find the desired app or type its name into the search bar. Sometimes the settings have been adjusted to show only your most used apps in the start menu.
If that is the case, and you’re looking for an app that isn’t listed in the start menu, the easiest way to find it is to type its name into the search bar. Once you’ve found the app you’re looking for, select it to open and run.
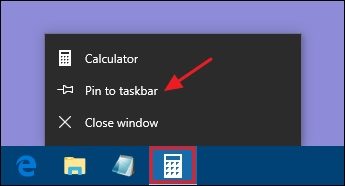
When the app is open, its icon will appear in the taskbar. When you see the icon, right-click, and a menu will pop up. Select “Pin to taskbar.” The app’s icon should now remain in the taskbar, even when the app is no longer running. You can click on the icon anytime you’d like to access that app.
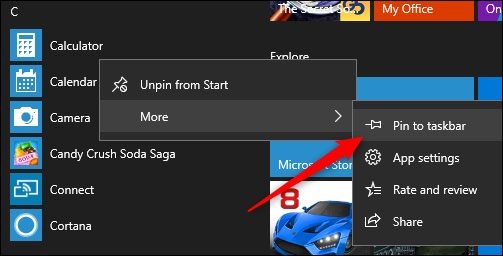
An alternative method for pinning an app to the taskbar does not require the app to be open. Instead, locate the app in the start menu and right-click rather than opening the app. This will bring up the option to select “More.” After pointing your mouse to “More,” a second menu will appear with the option to “Pin to taskbar.”
A third method allows you to pin apps by simply dragging the icon into the taskbar.
To do this, select the icon of the app and hold down your mouse on the icon while moving it across the screen to the taskbar. When you’ve done this, the app’s icon will remain in the taskbar as a shortcut, even when you’ve closed the app.
Unpin Apps From the Taskbar
The shortcuts on the taskbar can be really useful, but if your taskbar becomes cluttered with too many apps that you’re no longer using regularly, it may lose some of its usefulness. When you have an app pinned to your taskbar that you don’t use very often, you may want to clean up your taskbar by removing that app’s shortcut.
Unpinning an app is even more simple than pinning an app. Simply right-click on the app’s icon in your taskbar. A list of options will appear. Select “Unpin from taskbar.”
Customizing and Using Jump Lists
Jump lists are a helpful way to keep important folders, individual files, or frequently accessed sites in an easily accessible area on your taskbar. Each app on your taskbar can have a jump list.
The jump list is the menu that shows up when you right-click on an app’s icon in your taskbar. This list will show action options such as “Open a new window,” recent files or sites you’ve opened, and any items you pinned to the jump list.
The items that are able to be added to a jump list can vary, depending on the type of app you are using. A web browser will show recent windows and websites you’ve visited, while an app like Microsoft Word will show recent Word documents you’ve viewed or edited.
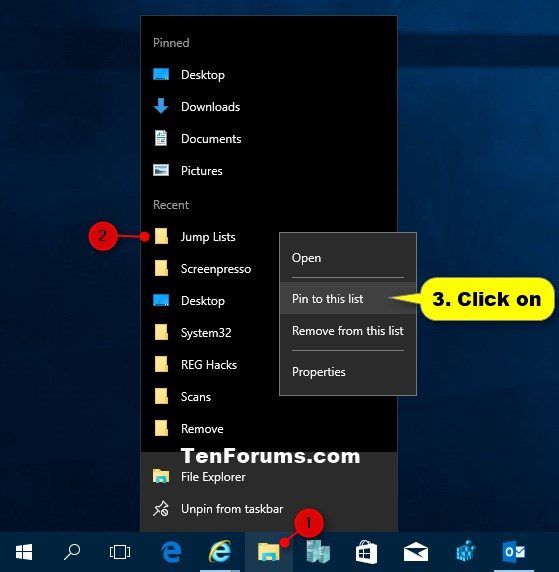
To pin an item to your jump list, hover your mouse over a recent item, and a pushpin icon will appear to the right of the item. If your desired item is not appearing in your list of recent files or folders, open the item in the app. And try again.
Once you’ve found the desired file, folder, or website in your list of recent items, click the pushpin icon. Now, the file or folder will remain in your jump list at all times. To unpin the item, select the pushpin icon again, and the file will no longer appear in your jump list.
Resizing and Moving Your Taskbar
Did you know your taskbar doesn’t have to remain in the default location at the bottom of your screen? You can move it to the easiest spot for you. If you find it easier to use when it’s located at the top or side of the screen, you can customize that. It also can be set to your desired size. If you prefer a larger taskbar to be able to fit more icons or see more clearly, it’s a good idea to adjust the size.
To move your taskbar, open “Taskbar Settings.” You can find the Settings by right-clicking on any area of the taskbar that does not contain any shortcuts or icons. When a menu pops up, “Taskbar Settings” will be located at the bottom.
Select this and in the window that opens, scroll down to find “Taskbar location on screen.” This will allow you to choose any corner of the screen to place your taskbar.
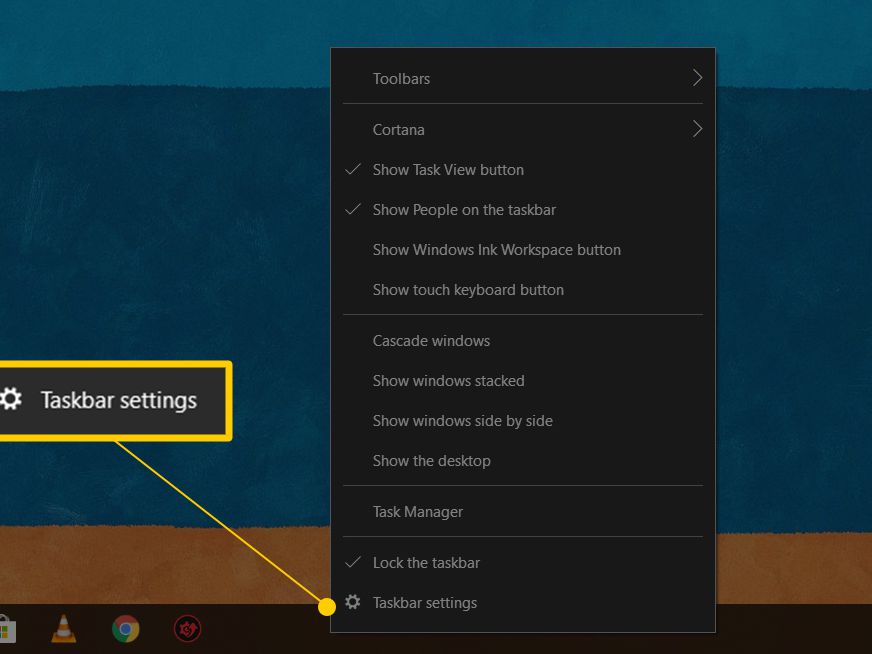
Another option for moving your taskbar includes simply dragging it to a new location. To do this, you’ll have to be sure the setting “Lock the taskbar” is turned off. When you right-click on an empty area of the taskbar, the “Lock the taskbar” option should show up in the menu. Click to turn on and off this setting.
Resizing the taskbar also requires the “Lock the taskbar” setting to be turned off. If you’ve turned it off while moving the taskbar to your desired location, keep the setting off. Then, select a corner of your taskbar and drag it to your desired size. It can become as large as nearly half of your screen.
Customizing Icon Size
It’s not just the size of your taskbar that can be changed. The size of the icons on your taskbar can be changed, as well. If you prefer to fit tons of icons onto a small taskbar, you can decrease the size of the icons.
To do this, open “Taskbar Settings” by right-clicking on an empty area of the taskbar. The settings window will have an option for “Use small taskbar icons.” Select this option, and your icons will shrink.
Shrinking the icons on your taskbar also shrinks the taskbar itself, which means the date will no longer appear next to the time. If you find this setting is not your preference, you can change it back to the original size by repeating the same steps.
Change the Taskbar’s Appearance
Users can customize the Windows 10 taskbar right down to the color and transparency. The default setting is black, but if you prefer a different color, open the “Taskbar Settings” by once again right-clicking on an empty area of the taskbar.
The settings window will show an option for “Personalization.” Select this option and then select the “Colors” tab. After that, you’ll have to scroll down to the section labeled “More Options.”
You should now see a toggle labeled “Transparency Effects.” You can select whether you’d like to have a transparent or opaque taskbar. This will also affect the Action Center and Start menu. To control the color, turn on the option “Start, taskbar, and action center.” When that option is enabled, you’ll be able to select your desired color from the color-chooser.
Adding and Using Toolbars
A toolbar is a shortcut to a folder that you can add to your taskbar. Toolbars make it easier to access frequently used folders. You can add either custom toolbars or use the built-in toolbars.
The built-in toolbars can be accessed by right-clicking on the taskbar and selecting “Toolbars” from the menu. You’ll see the three built-in toolbars, “Address,” “Links,” and “Desktop,” as well as the option for “New Toolbar.”
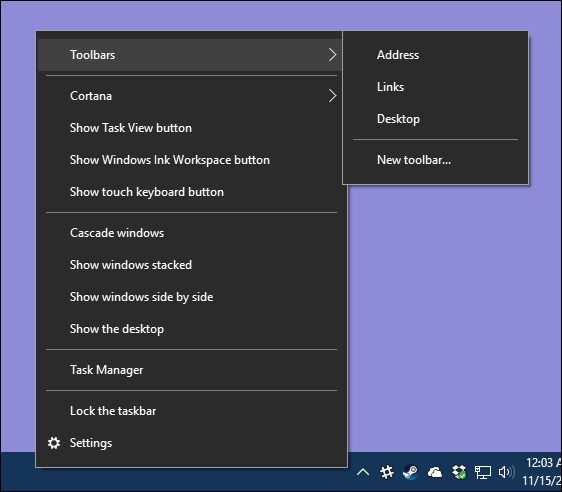
The “Address” built-in toolbar allows you to access a website while skipping the step of opening a browser window. Instead of opening a browser, simply type the web address into the address box, and this toolbar will open the website in a browser window for you.
The “Links” built-in toolbar shows you links from your Internet Explorer “favorites list.” Similar to the “Address” toolbar, this toolbar lets you access your favorite websites without opening a browser window. The “Desktop” built-in toolbar gives you a shortcut to any items stored on your desktop.
If you’d like to create a custom toolbar, instead of selecting one of the built-in toolbars, select the option beneath “New toolbar.” Then select the folder you’d like the toolbar to give you access to.
The Windows 10 taskbar is a great tool for making your computer easier to use. If you would like assistance customizing it to make it work perfectly for you, consider reaching out to HelpCloud technicians for remote support to help resolve the issue.
