
Time is something that seems to be an especially scarce commodity these days in the rat race of life which we find ourselves in. It speeds by us in hasty moments, ticking minutes that dash by in quick succession and leave us wondering where on earth the time went. Time passing is one of those many inevitable facts of life which we have to deal with every day.
One other inevitability seems to be that whilst time feels like it is speeding up and moving faster every day, other things around us are slowing down. Whether it is your household appliances, your mobile phone or other devices, it’s nothing new that things do slow down over time. In fact, we find that even our own bodies seem to prefer taking things slow instead of keeping up the fast paced rat race.
What is annoying, though, is when our devices slow down, freeze up or just refuse to start up in the first ten minutes after switching them on. This becomes a problem that can be highly frustrating, especially if patience isn’t your strong suit.
Because let’s be honest, none of us really enjoys waiting for excruciatingly long minutes whilst our Mac powers up and decides to get itself up and running. After all, we bought it for speed and efficiency, not to stare at a blank screen devoid of anything except a colorful beach ball doing somersaults.
So for those who prefer things to work at a faster pace, we’ve put together a few ways to make sure that your Mac will be working at optimum speed and efficiency so that you can take things slow in other more important areas of your life.
Remove Programs On Startup
When the Mac powers up, you will often see that once it has started there are applications that are opened up or that pop up on the screen. These are programs or applications that have been programmed to start up when you start your Mac.
If you have a lot of these applications or programs that need to start when you first turn on your computer, you will find that it takes quite a while for your macOS to get up and running.
In this case, less is more — for example, the less programs and applications you have running on startup, the faster your computer is going to get up and running and the more efficient your startup process is going to be. Therefore it is expedient to have as few programs and applications running on startup as possible.
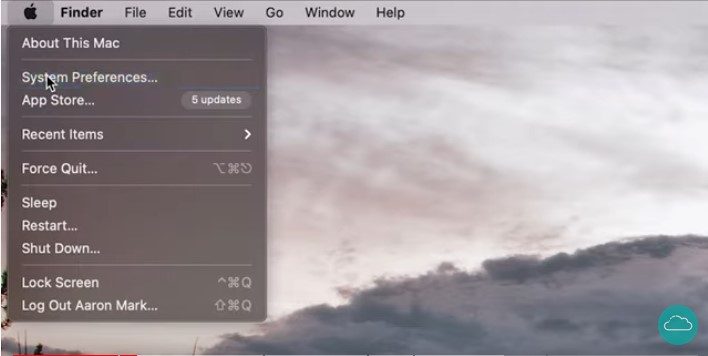
To remove programs from your startup, you are going to need to go to your home screen, left-click on the little Apple icon in the top left-hand corner of your screen and then left-click on System Preferences.
In the window that opens up, look for the icon that says Users and Groups and then left-click on that. In the left-hand window pane, you will need to select the specific user (if you have multiple users you are going to need to do the next steps for each one) by left-clicking on the user name and then in the right-hand window pane you will select Login Items at the top of the screen.
You will see that there is a list displayed of all the applications which open up on startup. You will need to go through the list and if there are any programs or applications which are not needed on startup, you can left-click on them and then left-click the little minus sign ( – ) at the bottom of the pane.
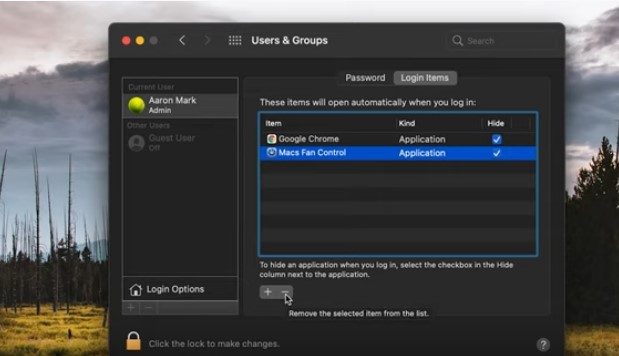
This will remove the program from your macOS startup process. If you only want to hide the program on startup, you can left-click on the checkbox and make sure that the checkbox has a tick in it. The next time you reboot your machine, you will no longer see these applications on startup.
If you accidentally delete a program you need, however, all you have to do is to left-click on the + symbol and select the program from the list in the left-hand pane. This will then add the program back to its original place.
Keep Your macOS Up to Date
If you haven’t checked for updates to your Mac OS (operating system), then now is definitely the time to do so. To check whether or not you have an update available, simply navigate to the top left-hand corner of your home screen and left-click on the Apple icon, then left-click on System Preferences.
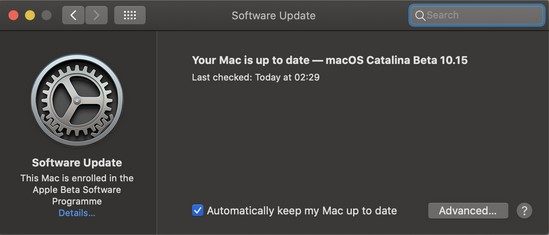
Your next step will be to left-click on the System Update option so that your Mac can search for any available updates. If an update is available, select the Update Now button and then wait while the update is installed. At the bottom of the screen you will see a check box next to Automatically keep my Mac up to date. Make sure that this check box is ticked, as this will automatically update your Mac whenever updates are available.
By keeping your Mac up to date you will find that it runs a lot faster than it did before and it will be much quicker on the start-up as well. However, not only should you keep your Mac OS up to date, you should also keep your installed Applications up to date.
To make sure that you are doing this, you can head on over to your Apple Store and then in the window pane on the left, left-click on Updates and then next to the ones that say Pending Updates, simply left-click the button that says Update.
This will update the applications which you have installed on your Mac and will also aid in keeping your device running at a decently acceptable pace.
Free Up Some Needed Disc Space
Over time you will most likely find that you have applications running on your Mac that you just don’t use anymore. Some are applications which you may have installed as a once off to complete a project and now you don’t need them anymore.
Or it could be a game you got tired of playing or a music application you don’t use. Whatever the case may be, it’s best to get rid of these space hoggers as they just slow down your Mac.
To free up some space, head on over to the Launchpad program, this is the one that is depicted by a spaceship icon. Once you have opened Launchpad, you will need to click and hold on any of the apps until all of the icons start to shake. Locate the application you wish to delete, then tap on the delete button — this is the X button.
However, you may find that some apps won’t have a delete option. If this is the case, you will need to go about it in a slightly different manner. Some applications, if downloaded via a disc or from the internet, require you to delete them in a more convoluted way.
Go to your Finder program — located in your dock and depicted by a blue square with a smiley face. Select Applications from the tab on the left-hand side of the screen.

Select the application you wish to get rid of and then drag it to your Trash Can in the dock — depicted by a trash can. If you would prefer not to drag it, you can also right-click on it and say Move To Trash.
Mac 101: The Final Word
While there are quite a few ways to help speed up your start-up and running process on your Mac, here is a last word that you might just not ever have thought of, even though you will find it is quite obvious and you probably know it but just forgot about.
When you want to close an application, instead of simply just tapping or left-clicking on the X in top corner of the application, you need to actually right-click on the application and select the Quit button.
If you only use the X option, you are not actually closing off the application, merely hiding it. If you see a small dot underneath the application’s icon in your dock, it means that the program isn’t closed, merely hidden.
It’s easy to forget about some of these more obvious steps but they are crucial ways that could end up speeding up your Mac and giving it a new lease on life.
You may want to consider also putting your Mac to sleep instead of shutting it down each time. If you aren’t using your Mac, put it into sleep mode instead of shutting down completely.
At the end of the day, it’s a given that at some point in time your Mac is going to slow down and you are going to need to take extra steps to speed it up, but by keeping these few steps in mind you will be able to make sure that point in time doesn’t come knocking on your door too soon.
As always, if you’re needing any kind of additional help starting up your Mac with greater speed and efficiency, consider reaching out to HelpCloud Technicians for remote support.
