
When you started your Apple computer for the first time, you were likely amazed with its speed and ease of use. Computers generally run smoothly and efficiently at first. However, as time passes, a device can slow for several reasons. When this occurs, there’s a few things you can do, like reinstalling macOS. Additionally, this post covers how to recover and recover your Mac operating system if the need should arise.
If this task is too difficult or you don’t feel confident performing this procedure on your own, consider reaching out to HelpCloud Technician by-the-hour.
Backup Before Starting
You never know how recovering, restoring and restarting your macOS will go. Although most methods won’t delete your files, there’s always a slight chance something will go wrong and files will be erased. To avoid associated headache, you’ll want to backup your files.
One of the easiest ways to backup your computer is with an external hard drive. This type of drive is a portable storage device that connects to your computer. Due to their large storage abilities, external hard drives are great candidates for computer backups.
If you don’t have a hard drive, you can purchase one online or in a computer-friendly store for a reasonable price. A device that costs around $50 should have enough storage capacity to handle an average computer user. Before you purchase an external hard drive, make sure it’s compatible with your Apple computer.
After your hard drive is plugged into your computer or connected wirelessly, open the main menu by clicking the Apple logo on the top of your screen. Under your preferences, select Time Machine.
You may also use the search bar to find this application. On the left, you will likely see a “Back Up Automatically” check box. Automating your backups can be very useful and save you time and trouble if your device loses data.
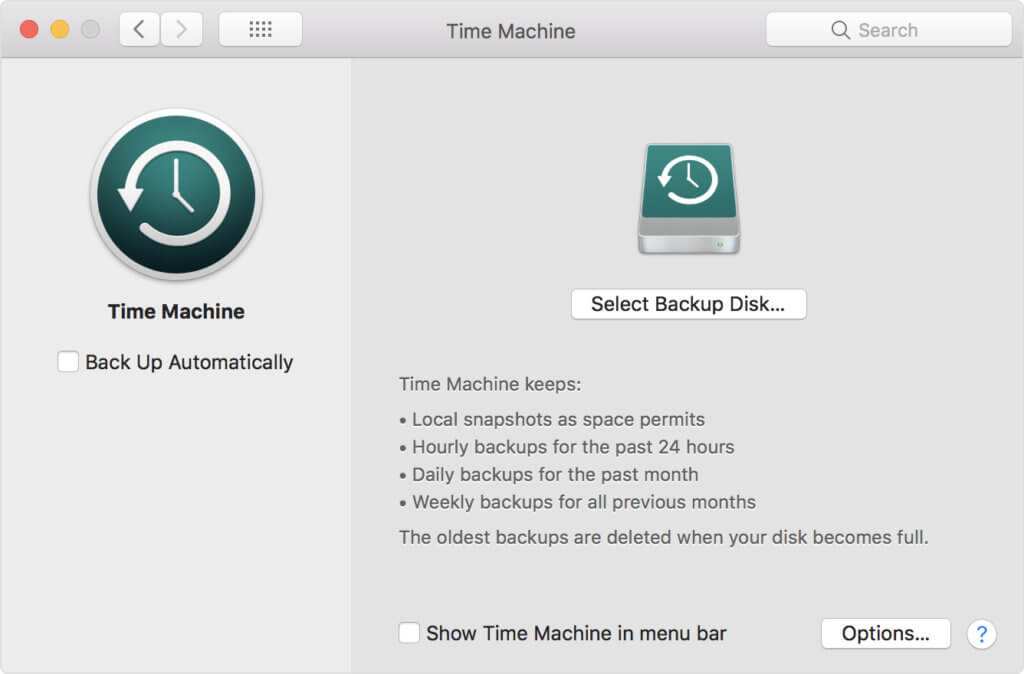
To backup, go to “Select Disk …” Under “Available Disks.” You’ll want to click on your drive followed by “Use Disk.” Depending on the computer, it can take around an hour or more to backup.
Look for Updates
You may feel that you need to recover, restore and reinstall your macOS when you really just need a software update. A lot of issues are resolved when you update software.
To update, open your System Preferences from the Apple menu. Click on “Software Update” to see if any upgrades are available. If one or more is listed, click “Update Now.”
Top Recovery Options
If downloading a software update doesn’t work, there’s several more things you can try. The “Command+R” recovery method loads macOS Recovery so you can install whatever version you have on your computer before getting into the utility.
The second choice is “Option+Command+R,” which will bring up macOS Recovery, allowing you to install a compatible update for your computer. Lastly, there is “Shift+Option+Command+R.” This final approach will provide you with whatever macOS was on your machine when it was first launched (or if it’s no longer available, the closest version).
Determining which of the methods above best suits your needs can be confusing. If you have any kind of difficulty making this decision, consider reaching out to HelpCloud Technicians for remote support.
To start the process, click the Apple icon in the upper left-hand corner of your computer screen. From the drop-down menu, left click “Restart.” The computer will start to reboot, and as it does, you will want to press and hold the “Command” and “R” keys until the Apple logo appears.
After several seconds have passed, the Apple logo should populate. When you see the logo, you can remove your hands from your keyboard.
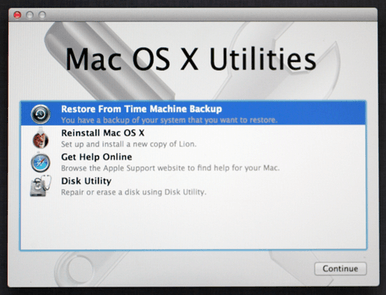
Your computer will boot into macOS recovery at this time. After the loading process is complete, the computer will lead you through a series of account questions, like what language you want to use. During this process, macOS Utilities will load. You should see several options when this menu opens. Depending on your device, you might see options like “Restore From Time Machine Backup,” “Reinstall macOS,” “Get Help Online” and “Disk Utility.”
If you have an external drive and have been creating Time Machine Backups, you can select the restore from backup option. You will need to plug in the external drive that stores the data in order to select a restore source.
Another option displayed that might be useful is to reinstall macOS. If you have a compromised OS, reinstalling macOS is a good plan. Keep in mind that reinstalling macOS shouldn’t delete your files, but things can go wrong with any process. In order to make sure you safeguard your photos and other important computer files, backup your computer first.
The Get Help Online choice will take you to Apple’s support website as long as you have an internet connection in place. The last listing on this menu, Disk Utility, can help if you would like to repair different drives, change their mounting, etc. For most people, this is not needed until selling a computer.
When you sell your device, you do not want any of your personal information accessible to the new user. So, before selling a device, you will open the utility menu and erase all of the data stored on your internal disk.
Before erasing, make sure the format reads “APFS.” This way, future users will be able to access the device without needing your predetermined passwords. After this is done, you’ll go back to the menu and click “Reinstall macOS.”
One thing to keep in mind when going through the steps above is that if you don’t have macOS Sierra 10.12.4 or later, your recovery options are slightly different. “Shift+Option+Command+R” won’t be available. However, “Option+Command+R” will still install the mac OS that came with your computer, and “Command+R” will launch macOS recovery.
Other Troubleshooting Options
After reinstalling your macOS, you might find that you’re still experiencing issues. Luckily, there are other quick fixes you can try to improve your computer’s performance. You can always try power cycling to start. Although it might seem silly to fix an issue by turning your computer off and back on again, it can often resolve many issues you’re having.
When you turn your computer off, make sure you restart through the Apple menu. If you force shutdown your computer when you don’t need to, there’s a slight chance you’ll do more harm than good.
Another option is to delete the applications you’re not using from your computer. Sometimes you’ll have slow software because it’s overloaded. It’s also possible for an app to slow down your software because it’s incompatible.
To clean your computer, you delete apps you’ve downloaded from the Mac Apple Store. When you do this, all of the app’s associated files should be deleted. In other words, the app shouldn’t be storing any extra info elsewhere on your computer.
A NVRAM reset can also be very useful. Your system memory has an area called NVRAM that stores hardware settings, like speaker volume and startup disk processing. To reset, power off your computer.
When you turn it on again, press and hold the keys “Command+Option+P+R.” Your computer will make a chiming sound, and then your screen may flicker. Your computer will chime again, and on the second chime, you can remove your hold of the keys. After this, your NVRAM will be reset.

Looking into disk permissions is another trick that can fix a lot of issues. A permission provides your computer rights to access various files. Repairing these permissions seems complicated, but it doesn’t have to be.
Start by opening the Disk Utility program from your applications. Your startup disk will likely be the first one pictured. After you select your startup disk, you can click “Repair Permissions.” While you’re in this menu, also click “Verify Disk” to make sure there aren’t any other issues going on with your utilities.
More On macOS
macOS is a program that allows a computer to carry out basic functions. Every Mac is equipped with a macOS, Apple’s operating system. Apple’s current OS is macOS Mojave. With Mojave, which gets its name from a desert in California, users have access to improved security and privacy features.
There are also several advantages on this operating system that are new to Mac computers. First, there’s a dark mode. This setting makes the whole system appear darker in color. The feature was used as a design aesthetic on apps in the past, but it’s now available as s system-wide offering.
The App Store has also been upgraded. With new search options, it’s easier to find what you need. There are also curated collections designed by Apple editors that can introduce you to apps you might benefit from and enjoy working with.
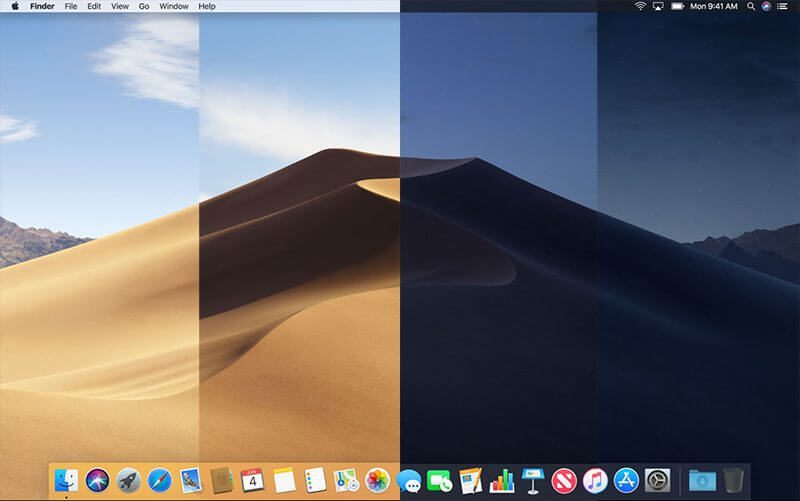
Another fun new feature is dynamic desktop. Depending on the time of day, your computer can show you images that correspond with what’s going on outside. For example, your desktop will display photos of beautiful sunrises in the morning, sweeping landscapes in the middle of the day and darkening skies in the evening.
On the privacy side of things, your search history is better protected with Mojave. The Safari app has Enhanced Tracking Protection built into it, which means it helps keep you safe on the web. There is also an Intelligent Tracking Prevention technology that will hide your “Likes” and other social media activities from being tracked.
Apple’s Operating System
Although macOS works well, it’s not always perfect. When you experience setbacks, see if the issue can be resolved by simply turning your computer off and on again. If not, you’ll want to backup your computer.
At this point, you can recover, restore and reinstall your macOS. However, this is not always needed. If you reach out to a HelpCloud Technician for remote support, you can access one-on-one assistance to get to the root of the issue before unnecessarily reinstalling your operating system.
