
Mozilla Thunderbird is a completely free email application you can easily install, use and customize on your devices. In some ways, Thunderbird is like Microsoft Outlook, which is a personal information manager users can purchase as a part of Microsoft Office. However, you might find Thunderbird a more helpful app because its customization options are much more plentiful.
Getting Started
In order to start using this emailing service, you must download the application. Pull up your favorite web browser and type in “Mozilla Thunderbird.” Click on the link that reads “https://www.thunderbird.net/en-US/.” After you click “Free Download,” a pop-up notification will display, and you should confirm that you’d like to save the file.
Then, open your downloads and run the file. You will be asked several questions after you run the file before it is installed. If you are having any kind of difficulty with the setting up and using of Mozilla Thunderbird Mail Client, consider reaching out to HelpCloud Technicians for remote support to help you resolve the issue.
After Installation
Do you already have an existing email? If so, you will likely want to continue using this email with the Thunderbird application. If you don’t have an established email, you can create one on the app.
Users with established emails should go to the “Tools” section of Thunderbird and click “Account Settings.” Select the radio button next to “Email account” and hit “Next.” You will then enter your name, email address and push “Next.” The following menu will ask if you want to use a POP or IMAP incoming server.
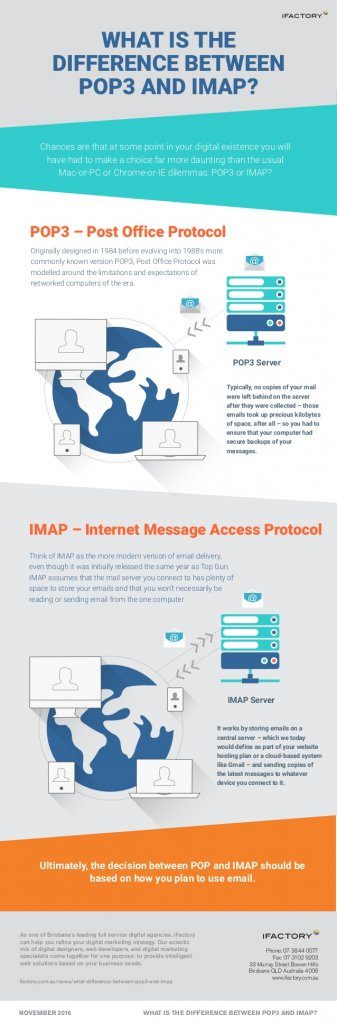
Most mail providers support Internet Message Access Protocol (IMAP), so chances are you have an IMAP account. If you have IMAP, all your emails are saved on your internet provider’s servers. However, Post Office Protocol (POP), which is an earlier protocol with limited functionality, is still utilized by some providers. If you have POP, your email is stored on your personal computer, not on a server.
After you determine what server you’re using, select either POP or IMAP. POP users will type “pop.secureserver.net” into their “Incoming Server” field and IMAP users will type in “imap.secureserver.net.”
After selecting “Next,” enter your full email address into both the “Incoming User Name” and “Outgoing User Name” fields. Before you can finalize, you will have to enter an account name, like “My Email.” If the information you’ve entered is correct, click “Finish.”
Navigate to your “Account Settings” window next and click the “Outgoing Server (SMTP)” section. Your server name will be “smtpout.secureserver.net” and the “Port” field should read “80.” With these settings in place, your email will route through a trusted a third-party server before it arrives in your inbox.
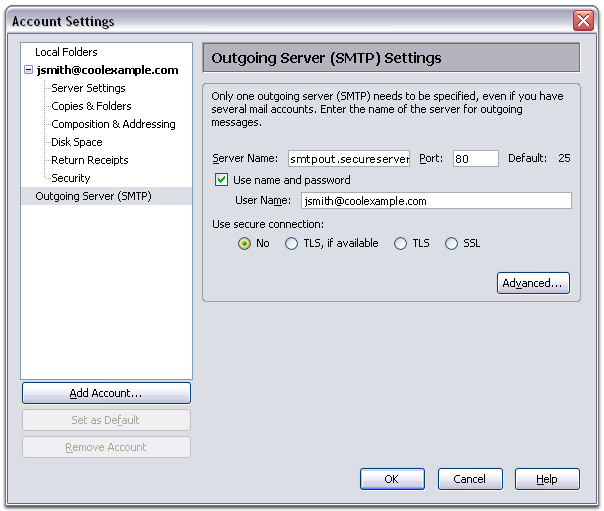
Under “Outgoing Server (SMTP) Settings,” select your email’s username and password. For outgoing mail to send in the same fashion, you need to activate SMTP relay on your email account. For help with this step, you can contact your email provider or reach out to HelpCloud Technicians for remote support.
Navigating Your Email
When you log into Thunderbird, your email should now display. With the click of a few buttons, you’ll be able to go to your inbox, create a new email, manage your current emails and more. If there is a default bar displaying in the bottom of your window that you’d like to remove, right click the top of the window.
Select your “View” tab, followed by “Layout” and “Vertical view.” With this alteration, your inbox will appear on the left side of the screen and your emails will display on the right. If you want a different configuration at any time, you can change these settings under “Layout.”
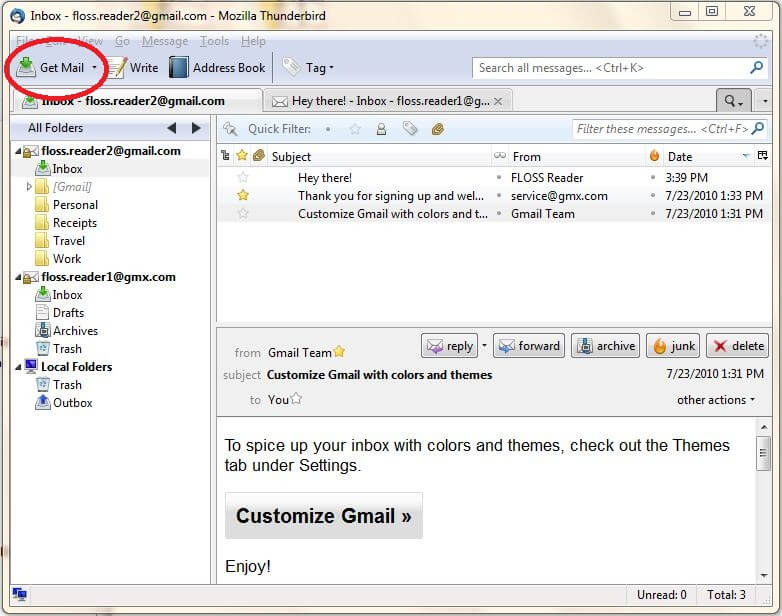
If your email doesn’t automatically download, make sure you click the “Get Mail” option in the top left-hand corner of the screen. To view your display settings, click on an email. You may notice there’s a banner on every one of your emails notifying you about how you can protect your privacy. You might also see that the photos included with emails do not display when you open a file.
To make sure emails display properly, pull up your “Tools” tab and go to “Options.” Under the “Advanced” section, click the button under “Config Editor.” In “Search,” type in “mailnews.message_display.disable_remote_image.”
Under the “Value” section, make sure your menu reads “False.” An easy way to do this is to double click “True” and it should change its value. Close out of Thunderbird and launch the app again. When the app launches, your emails should display in their entirety.
Another thing you might quickly notice is there is no print button. To make a hardcopy of an email, click “File” and then select “Print.” To add a print button, right click on the right-hand icon on the bar at the top of the app’s window. Under “Customize,” you’ll find a “Print” option that you can drag and drop to your email’s top menu.
Along the top of any open email, you will have a few default options, such as “Reply” and “Archive.” To add or remove options from this menu, right click any of the icons and then select “Customize.” You can then drag and drop items to and from the window that displays to add or remove them from your email display.
Looking at the left of your screen, there’s a few helpful things to keep in mind. First, there will be a green dot next to some emails. When you see this color dot, it means the email is unread. To quickly change the read status of an email without opening it, you can click on the green dot.
A paperclip icon next to an email means it includes an attachment. An attachment is any type of file that’s sent with an email. Photos, videos and mp3s are all examples of attachments. Another helpful thing you can do to flag important emails is to click the star icon next to them.
Address Books
You will want to send emails to your contacts without having to look them up every time. When you click “Address Book” on your email, a window will open with two different address books. The first address book will be your personal book, which are the emails you’ve collected before using Thunderbird. The second book will save the emails you use while accessing the app.
To make sure you have all the contacts you need, import your contacts from your email. Log into your email on your preferred web browser. Then, export your contacts as a .vcf file.
You can then download your vCard to your computer. Back in Thunderbird, under “Tools,” select “Import.” Click the radio button next to “Address Books” and import your vCard. From this point, you can easily find your contacts and email them quickly.
Theme Customization and Helpful Add-Ons
As mentioned above, one of the best parts about using Thunderbird is its customization features. Although there are several ways to make this app your own, one of the quickest ways is with themes.
On the Thunderbird theme page, look through the available options and find the one you want. After you’ve identified your desired look, right click on the theme and hit “Install Now” and “Save File As.” You will then be prompted to save the file on your computer.
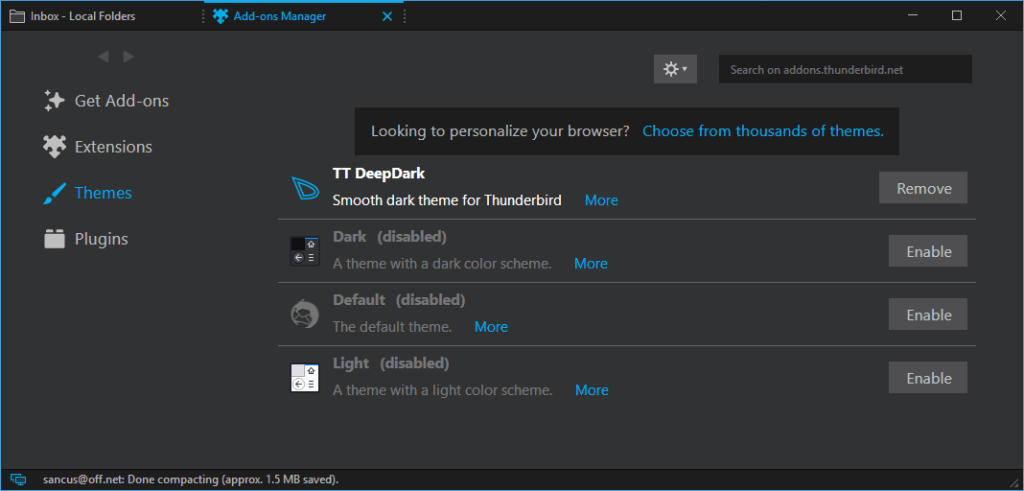
After the file is added to your device, open Thunderbird. Under “Tools,” go to “Themes.” Hit “Install” and “Select theme to Install.” After you identify the file you downloaded, click it and select “Save.” Finally, you’ll select “Use Theme” and then close Thunderbird. When you reopen Thunderbird, your new theme will display.
Another really helpful customization option is to add items to your application. To add a calendar, go to “Tools” on your app and click “Add-ons” followed by “Get Add-ons.” In the search bar, type “Calendar.” There are several available calendar add-ons that you can choose from at this point.
“Mail Merge” is a specific add-on that is very helpful if you ever send emails to more than one person. For example, say you want to invite 30 of your family members to a reunion. To do this, you’d generally either have to send the same mass email to everyone or customize 30 personal emails.
With Mail Merge, you can make sure one email draft turns into several personalized messages. So, instead of typing out a unique email to every family member, you can use a variable, like {{FirstName}}, to ensure every recipient gets an email that’s addressed to them specifically.
Another quick way to help your inbox stay organized is to use XNote++.
With this feature, a post-it note can be added to every email you receive. So, when you’re reading an important email and need to remember information, you don’t have to print it out or hand write everything down. Instead, you can copy and paste vital insights into a pop-up and save them for later.
Ultimate Customization, Easy Emailing
Thunderbird is an amazing application that you can customize and access across numerous devices. Whether you use a Mac, PC, iPhone, Tablet or combination of other devices, you can download Thunderbird to access email on all of your working platforms.
When it comes to all Thunderbird can do, the information above only scratches the surface. Thanks to its free, open-source, cross-platform nature, you can use Thunderbird for much more than email.
