With dozens of phones available, it’s hard to know which one you should choose. Luckily, one smartphone stands out amongst the rest when it comes to accessibility and helping seniors age in place, the iPhone.
The iPhone is made by Apple and is accessed with a touchscreen interface. In many ways, the iPhone is a smartphone that combines an iPod, digital camera, computer and cell phone into one. You can also use Apple’s App Store on the iPhone, furthering the device’s functions and possibilities. From health apps to weather apps, the iPhone offers virtually everything you need to age with dignity.
1) How Do I Take Photos?
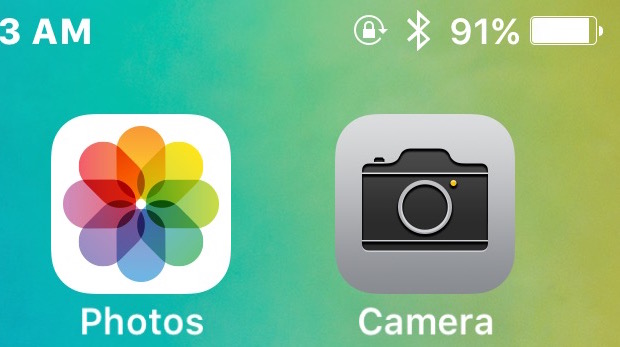
After you purchase an iPhone, it won’t be long until you’re using it to take photos. All you need to do is find the “Camera” icon on your iPhone’s home screen, open it and then click and shoot. If your iPhone is still on factory settings, meaning you haven’t changed anything around, the Camera app will be positioned on the upper row of icons on the right-hand side.

You can also access the camera from the lock screen. When your phone is locked, double-tap the home button and then you can select the “Camera” icon on the bottom-right corner. To select, put your finger on the icon and flick it towards the top of the screen in an upward motion.
Once the camera is open, point it at whatever you want to capture. The iPhone display will act as your viewfinder as you orient your camera to take the picture. To take a photo, tap the icon that looks like a camera at the bottom of the screen.
If you want to take the photo as a portrait, or vertical, leave your phone upright; to take a landscape, or horizontal, turn your phone to the side and the camera should automatically adjust. If it’s hard to tap the “Camera” icon on the viewfinder, you can also take a photo by pressing the volume up button on the side of your phone.
Sometimes, you might find that when you want to take a photo, your iPhone is in video mode. When you’re in video mode, look toward the bottom of the viewfinder and select the “Camera” icon rather than the “Video” icon.
2) How Do I Transfer Photos From My iPhone to My Personal Computer?
Digitizing your photos is simple with an iPhone. After you have a collection of photos, or even one new photo you want to ensure is backed up, you can transfer the data to your personal computer.
Start by making sure you’re running the most up-to-date version of iTunes. If you have a Mac, click the “Apple” icon in the left-hand top of your screen, select “System Preferences” and then click “Software Update.” If there’s an iTunes update available, click install.
PC users can update their iTunes by opening the app, clicking “Help” and “Check for Updates.” You will then see a series of prompts that you must follow to check for available updates. In the event any updates are available, you can then install them while in the app.
After your iTunes is updated and you’re using a Mac, you’ll want to connect your iPhone to your computer using a USB cable. As soon as you unlock your device and verify the computer, your Photos app should open automatically. You can also open it yourself by clicking on the application.
Your Mac should then display an import screen. You can either import a section of photos by selecting them first and then clicking “Import Selected,” or you can click the “Import All New Items” button. After the photos are uploaded, you can safely eject your iPhone from your computer.
Shortly after you update your PC’s iTunes, connect your iPhone to your computer with a USB cable. Then, make sure you’re running Windows 10. To see what system you’re running, select the “Start” button followed by “Settings,” “System” and “About.” Look at the “Windows Specifications” section to see what version your device is running.
Once you see you’re running Windows 10, select the “Start” button again followed by “Photos.” Click “Import From a USB Device” and follow the instructions that are presented.
3) How Do I Transfer Photos From My iPhone to My Mac Using the AirDrop Function?
AirDrop uses Bluetooth to quickly and easily transfer files between Mac devices. You can AirDrop nearly everything, from contacts to Map locations, between devices.
To quickly send photo files from your iPhone to your Mac, open your “Photos” app on your iPhone. Once the app is open, select what you would like to transfer to your computer. Tap the “Sharing” icon, which looks like a box with an arrow coming out of its top, and your computer should populate under the AirDrop section.
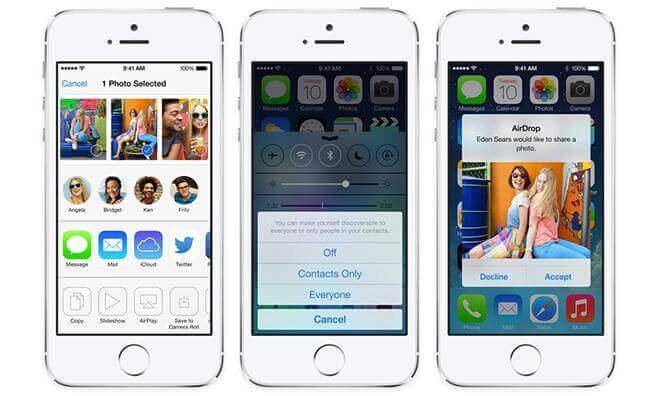
If you don’t see your computer on your iPhone’s screen, make sure your computer is able to be discovered. From your computer’s “Finder” window, choose “AirDrop.” Click the “Allow me to be discovered by” section and enable your computer to be discovered by either “Everyone” or “Contacts Only.”
After you’re discoverable, go back to your iPhone and tap the “AirDrop” icon again after selecting the image(s) you want to transfer; your computer should then appear on the list, allowing you to send the photos.
As long as the AirDrop window is open, other devices will continue being able to transfer data to your computer. For security purposes, it’s best to turn your AirDrop off after you’ve transferred your desired images.
4) Should I Backup My Phone?
You should routinely backup your iPhone so you never need to worry about losing files or erasing your saved settings. Luckily, backing up your iPhone is pretty easy, and you can do it often through either iTunes or iCloud.
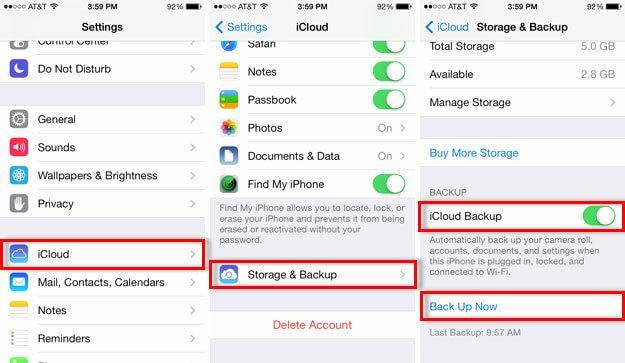
iCloud is a storage system that securely stores your data online. The nice thing about iCloud is that once its backup feature is turned on, it’ll backup automatically. To make this happen, connect your iPhone to a private WiFi connection. Select “Settings,” “iCloud” and “Backup.” Then, turn on “iCloud Backup.” To backup, select “Back Up Now.”

To backup using iTunes, open iTunes and connect your phone to your computer with a USB cord. Click “File,” “Devices” and “Backup Now.”
No matter which way you backup your phone, you’ll want to make sure it’s backed up every two to four weeks.
5) How Do I Restore My Phone From a Backup?
If you use iCloud to backup your device, you need to delete all of its contents before it can be restored. Tap “Settings,” “General” and “Reset” followed by “Erase All Content and Settings.” After your iPhone is wiped, turn it on. You should see a “Hello” screen, and you’ll want to follow the prompts until you reach the “Apps & Data” section, at which point you’ll select “Restore from iCloud Backup.”
After your sign into iCloud with your Apple ID, you can decide which backup you want to use. Make sure you stay signed into WiFi until your entire restore is completed. Generally, the entire process takes less than an hour.
To restore from iTunes, open iTunes on your computer and then connect your phone with a USB cable. Select your iPhone when it appears in iTunes and tap “Restore Backup.” After you select your desired file, the restore will finish in about an hour or less.
After the restore is complete, your phone will restart. Make sure to keep your device connected to your computer while it restarts. This way, it’ll have time to sync with your computer. Once the sync is over, you can safely disconnect your phone.
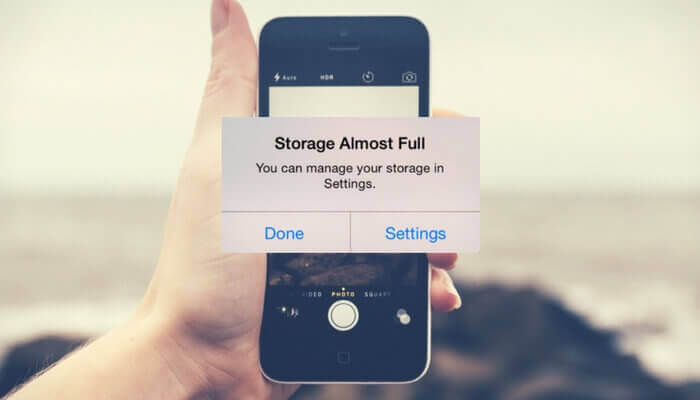
6) What Do I Do When My iPhone’s Memory Is Almost Full?
Before you delete anything, make sure your phone has had time to backup. When you backup your device, you can rest assured that all of your iPhone’s data has been saved in a file that you can access, even if something happens to your iPhone.
Many iPhone users have seen a notification that reads, “Storage Almost Full: you can manage your storage in Settings” before. When you see this message, it’s time to declutter your device. If you don’t take the time to manage your storage, your iPhone will get slower and some applications might refuse to open.
One easy way to free up storage is to delete anything you’re no longer using. Any applications that no longer serve you or were accidentally downloaded can be deleted by going to “Settings,” “General,” “Usage,” “Manage Storage,” and then you can delete any items you no longer want.
Another great way to increase your storage space is to delete photos and videos you’ve already uploaded to your computer. To delete, select the photos and videos you want to erase and then click the “Trash” icon.
Clearing your web browser’s cache can also help you keep your storage under control. If you use Safari, which is the default browser, go to “Settings,” “Safari,” “Clear History” and “Website Data” to manage your cache.
The Questions and Answers Don’t Stop Here …
The six common iPhone questions above are a good start, but they really only scratch the surface. At some point, you might run into more questions, like how do I know if my battery is going to die? Is there anything I can do to make my text size larger? When these questions come up, you’ll want a membership with a computer support company to access the information you need.
