
As a result of the rapid advancement of computer technology in the last couple of decades, there has been an increase in the multitude and variety of gadgets, devices and appliances which we now have at our fingertips.
Not only do we have high speed internet and Wi-Fi, but we are now also in possession of a plethora of wireless access point devices which allow us to extend the wireless coverage of our current networks as well as giving us the ability to connect multiple users to that network.
With an increasing amount of work being done online these days and the buildup of Wi-Fi congestion, there is a need for more users being able to access work networks at the same time and needing a strong Wi-Fi signal whilst doing so.
If you have a small to medium sized business and are looking for a wireless access point to free up Wi-Fi congestion, then the new NETGEAR Insight WAX630 could be just the product you’re looking for.
The WAX630 is Netgear’s latest Insight wireless access point, being powered by faster and ultimately more reliable Tri-Band Wi-Fi 6. It is able to supply high performance Wi-Fi to both business and home (although it would probably be a bit overpriced for use in the home) even in higher than normal density environments.
Unboxing the Insight WAX630
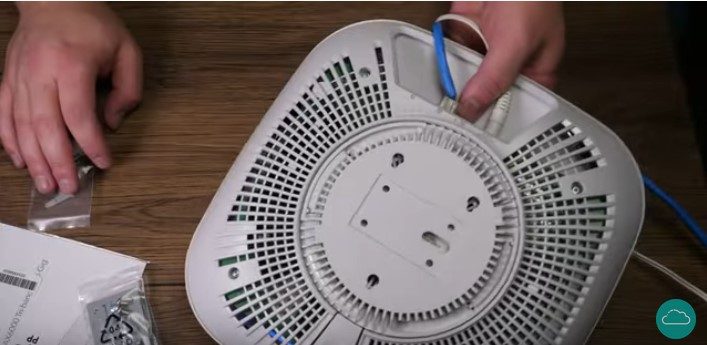
You’ve decided to invest in the latest NETGEAR Insight WAX630 Access Point and it has been delivered and now the fun begins. If you don’t have a PoE (power over Ethernet) enabled switch then you will need an AC adapter which will plug into your WAX630.
This is something you need to check before you buy the Access Point because the cheaper option doesn’t come with the AC adapter, so make sure to check that, if you need one, you will be getting one with your WAX630.
Once you open the box you will notice that there is a mounting bracket as well as various screws and plates should you wish to fix your access point to a wall or other surface. It also comes with a user manual in case you get stuck and need some extra assistance in understanding your new device.
If you do choose to mount the access point, you will find that it slots really easily into the mounting bracket and if you wish to remove it again all you have to do is switch it off and then just press the release button and rotate it.
You’ll notice that the access point is also very well ventilated underneath to prevent it from overheating, which is definitely a bonus point as it is most likely going to be working quite hard. Another perk is that you can access the Insight WAX630 from the app or from your web browser in order to maintain it; you will not need to be connected directly to it.
Your device also comes with a yearlong subscription to the NETGEAR Insight cloud software, after which it then costs you ten dollars per year per device in order to maintain your Insight device.
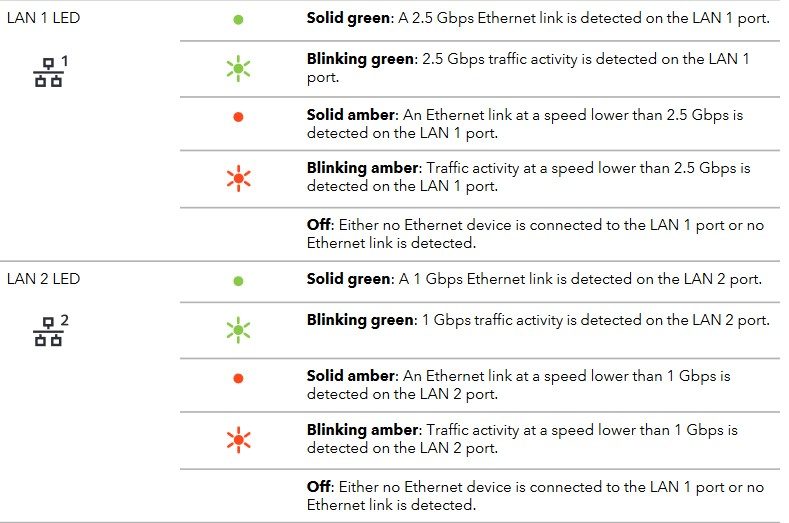
The device has two Ethernet ports; the first one supports a high speed of up to 2.5 Gbps (Gigabits) and the second one supports a speed of up to 1 Gbps which you can use to back link to a different access point or a network switch if you want to expand your network in that way.
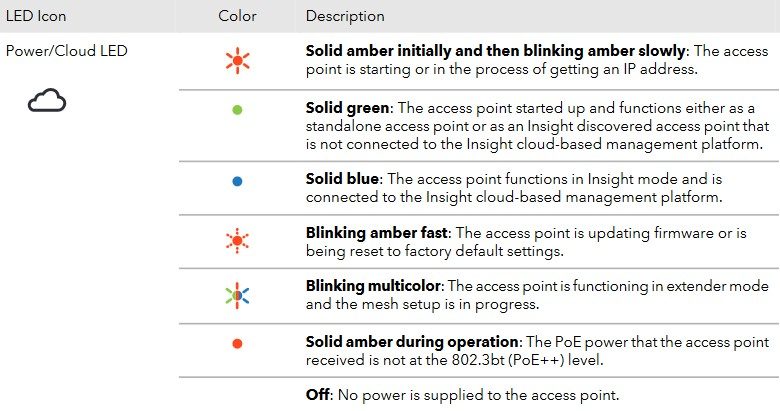
On the front of the device are numerous LED lights with icons. Each one represents a different function. The first one is the cloud icon which also represents the power icon. When the device is first started up the cloud icon will be amber and flash, after which it will either turn green or blue, depending on whether or not you are connected to the Insight cloud-based management program.
The two icons next to the power/cloud icon are the Ethernet port icons. If the lights are off then it means that there are no Ethernet devices connected or identified, whereas if they appear green then it means that an Ethernet device is connected. If the green light is blinking then it means that activity on the Ethernet port has been detected.
The last three icons are for the 2.4 GHz (Gigahertz) WLAN (wireless local area network), the 5 GHz H (High) and the 5 GHz L (Low). This means that this device is a Tri-Band Wi-Fi 6 access point, able to have eight wireless networks that can be individually controlled and set up on this device.

The device is able to handle up to one hundred users concurrently and 600 users overall. It can also be used in conjunction with other units like this one or another brand as long as it is mesh compatible. It can also cover a square foot of 3500 feet.
Setting Up the Netgear Insight WAX630 Access Point
To get started, you will need to use your smart phone and install the NETGEAR Insight app from your Google Play or Apple Store. While you are installing the application, plug your Insight WAX630 into the AC power adaptor and turn it on — if you have a PoE switch then you can follow the steps in this video to set up that way.
While it is booting up you can then continue to set up your NETGEAR account. Once you have installed the application you will need to open up the application and then register for an account and log in.
You will notice that the light on the cloud icon will start to flash, which shows that you are busy setting it up. Once you are logged in to your app, you will either see the Insight WAX630 appear on your screen — in which case you can tap on the button where it says “Unclaimed” and continue to set it up — or else you can tap the + icon in the top right hand corner of your screen to add a device and then you can either scan a barcode or a QR code. If you turn your device over you will see the QR code on the back.
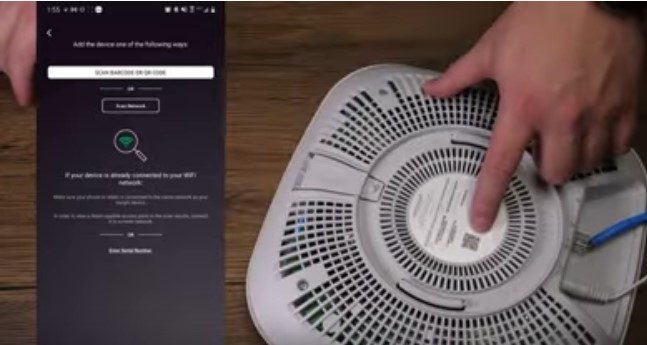
Once you tap on Scan Barcode or QR Code then you will need to hold your phone over the QR code on your device and then once it has scanned the code it will automatically pick it up and you can continue with the setup.
The next step is going to be setting up a network location, which can be the business name or you can have it segmented and different names for each. For example you can call it Office One AP1 and Office Two AP1.
Once you have a name you will then need to set up a password for your device. This password will take over any default passwords that may be on the device or on any other devices that are connected in the network. To continue you will need to tap on Next and then on OK.
It is now time to name your device, so you can give it any name you like and then tap on Done and then on OK. Next on the list is setting up the wireless network. Choose a name and password and then tap on Advanced Wireless Config to see all of the advanced options.
You can change the bandwidth to 2.4 GHz, 5 GHz or both. There are many different options which you can go through at your own leisure and explore. Once you are done making any changes, tap on Save and then tap on Setup and Progress and then on View Devices.
Keep in mind that it can take a while for the device to finish configuring. Once it has finished configuring, though, you will be able to explore your device via the app.
On the home screen, if you tap on Wi-Fi Networks you will be able to see which Wi-Fi networks have been set up and you will also be able to set up more if you wish to do so. Under the Usage tab on the home screen you will be able to see any kind of usage (devices which have connected to your access point etc) that has occurred.
Once it has all been set up, you can do a speed test to see how well your WAX630 is doing at easing the congestion by navigating on over to www.speedtest.net. Make sure you know whether you are connected to the 2.4 GHz or the 5 GHz connection as this will probably make a difference in the speed.
To Buy or Not to Buy?
Overall the setup for the NETGEAR Insight WAX630 is really simple and it brings some real world solutions to congested office networks. It can even be beneficial in homes that have big families or a multitude of Wi-Fi devices that all need to be working at the same time.
It is reliable and has a great many features that make it the perfect access point for small to medium sized businesses. If you’re looking at this for home use, it would be wise to keep in mind the cost factor as the yearly subscription fee per device could end up totaling more than you are comfortable paying and there are a few cheaper options on the market should you prefer to weigh up your options first.
However, while it may be the most expensive in the NETGEAR access point family, it is by far the best so it is definitely worth the investment.
As always, if you’re needing any kind of additional help learning about the NETGEAR Insight WAX630 Access Point, consider reaching out to HelpCloud technicians for remote support.
